
Mastering 3D Printing Wall Thickness: A Comprehensive Guide to Optimal Part Strength and Quality
In the dynamic world of additive manufacturing, achieving successful prints consistently is paramount, irrespective of the technology employed. Both novices and seasoned professionals can encounter various pitfalls that prevent their 3D printed parts from meeting desired specifications. Among these critical yet often overlooked considerations is the crucial parameter of wall thickness. Understanding and optimizing wall thickness is fundamental to ensuring the aesthetic quality, structural integrity, and long-term durability of your creations, effectively minimizing print failures and maximizing performance.
Wall thickness, a distinct parameter not to be confused with infill density or layer height, precisely defines the measurement of the outer shell or perimeter of a 3D printed component. It specifically refers to the material layers forming the exterior boundaries, excluding the solid top and bottom layers. Unlike the internal structures (infill) which can be varied in solidity and pattern to save material or weight, the outer walls are typically solid and bear the primary responsibility for a part’s overall stability, surface finish, and mechanical strength. This guide will delve into essential questions: What constitutes the minimum and optimal wall thickness? How can users accurately determine the correct settings for their specific projects? And why does this single parameter hold such significant importance in the complex ecosystem of 3D printing?
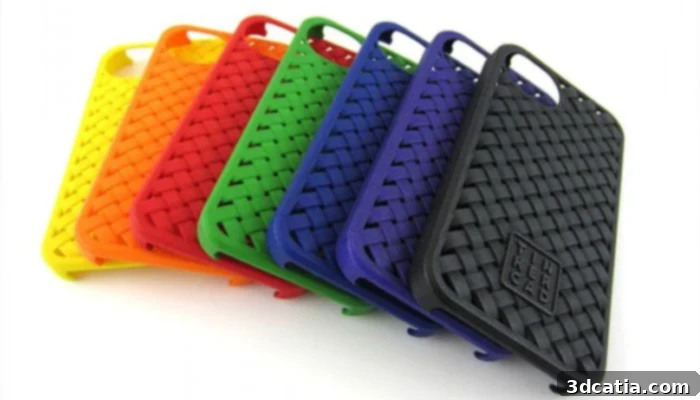
Wall thickness refers to the outside shell of the part (photo credits: Materialise)
Why Is Wall Thickness So Important in 3D Printing?
With an array of parameters demanding attention during the 3D printing process, you might wonder why wall thickness stands out as a particularly critical factor. The answer lies in its profound impact on nearly every aspect of the final print, from its visual appeal to its functional performance. Proper wall thickness is not merely about aesthetics; it is fundamental to the strength, durability, and reliability of the printed part. Incorrect wall thickness, whether too thin or excessively thick, can compromise the part’s intended function, leading to costly and frustrating print failures. Indeed, many experts argue that its influence on the quality of the final 3D printed part can be even more significant than that of infill settings alone.
The implications of improper wall thickness are far-reaching. One of the primary advantages of optimizing wall thickness in FDM 3D printing, similar to other parameter adjustments, is its effectiveness in preventing common issues like warping and delamination. Adequate wall thickness contributes significantly to reducing internal stresses within the printed object. When walls are too thin, parts become inherently fragile and highly susceptible to breakage, cracking, or deformation. This vulnerability can manifest at various stages: during the printing process itself due to insufficient structural integrity, during handling, or even in post-printing applications under minimal load. Thin walls struggle to withstand external forces or internal pressures, making them prone to structural failure.
Furthermore, thin walls can severely complicate post-processing operations. If support structures are necessary for complex geometries, removing them from overly thin walls can easily damage or break the delicate features. Similarly, processes like vapor smoothing, which involve exposing parts to solvents, can cause thin walls to deform, melt, or disintegrate. For such applications, it is absolutely essential to adhere strictly to the minimum wall thickness requirements specified for the chosen material, ensuring the part can endure both the printing and post-processing stages.
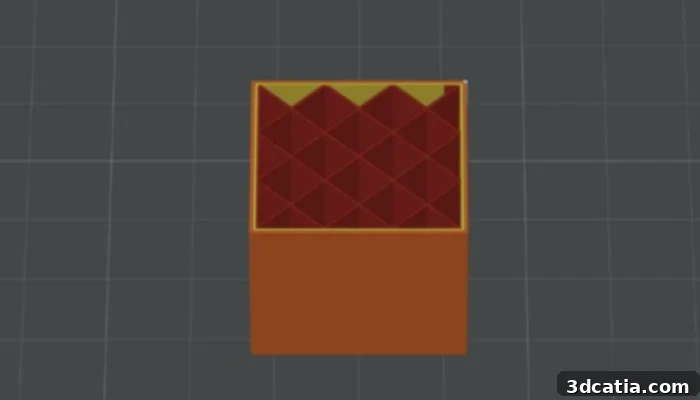
Wall thickness refers to the outer shell of a 3D printed part, not to be confused with infill in the interior (photo credits: 3Dnatives)
Conversely, walls that are excessively thick also present a unique set of challenges and problems. The most immediate drawbacks are increased material consumption and extended print times, which directly translate into higher costs and reduced productivity. Printing thick walls means using more filament or resin than necessary, resulting in wasted resources and inflated project budgets. The longer print duration also ties up the printer, delaying subsequent projects and impacting overall efficiency. Beyond these practical concerns, overly thick walls can introduce other critical issues.
While sufficient wall thickness is crucial for managing internal stress, an overabundance of material can paradoxically exacerbate this problem, especially with certain materials like metals. In metal 3D printing, excessive material can lead to uneven cooling and increased residual stresses, which in turn can cause cracking or warping during or after the print. Even in plastic parts, too much material can hinder proper heat dissipation. When layers are deposited too thickly without adequate cooling time, residual heat can accumulate, leading to poor layer adhesion, bubbling, surface blemishes, and structural weaknesses. Furthermore, thicker walls often experience greater material shrinkage as they cool. This amplified shrinkage can intensify warping tendencies, undermining the dimensional accuracy and structural integrity of the final part. Finding the ideal balance is key to leveraging the benefits of strong walls without introducing new problems.
How to Determine Optimal Wall Thickness for Your 3D Prints
Determining the optimal wall thickness is a balancing act, crucial for success across all 3D printing processes. While the principles apply broadly, we will focus specifically on FDM 3D printing due to its widespread accessibility and the direct influence of nozzle parameters. It is vital to remember that the ideal thickness is intrinsically linked to the material properties rather than solely the printing technology itself. Therefore, even with general guidelines, specific minimum and maximum requirements for each material must be meticulously considered by users.
For instance, common materials like PLA typically have a minimum recommended wall thickness of around 0.8 mm, though for very fine details, it might be possible to go slightly lower with advanced settings. However, the ideal thickness for robust PLA parts often sits closer to 1.5 mm, providing a good balance of strength and material efficiency. Other rigid plastics such as ABS or PETG have similar ranges, often requiring slightly thicker walls for enhanced impact resistance or higher temperature applications. Conversely, flexible, rubber-like materials like TPU demand a higher minimum wall thickness, typically around 2.0 mm, to maintain their integrity. Yet, users aiming for maximum flexibility in their TPU parts must be careful not to make the walls excessively thick, as this would make the part bulky and rigid, counteracting the material’s inherent properties.
For FDM 3D printing, a highly effective and widely adopted method for determining wall thickness involves using a multiple of your printer’s nozzle diameter. This approach offers a practical way to ensure consistent and reliable extrusion. Considering that most FDM nozzles have a standard diameter of 0.4 mm, a common recommendation for wall thickness is at least 0.8 mm, which equates to twice the nozzle diameter (2x). This provides a foundational level of strength and ensures that the outer shell is formed by at least two extruded lines, enhancing structural cohesion and minimizing voids.
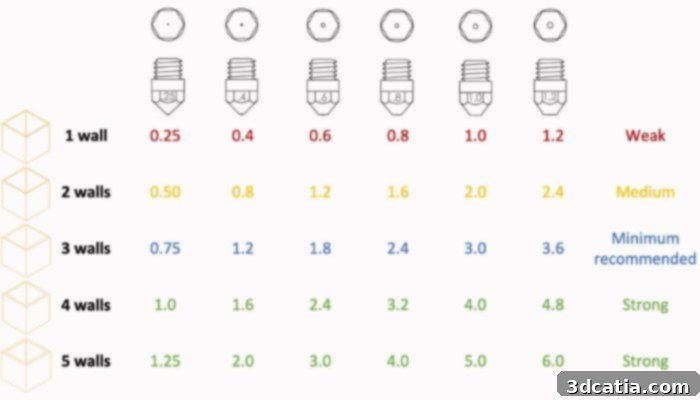
In FDM and FGF 3D printing, the nozzle diameter will help determine the wall thickness (photo credits: Pollen AM)
If your application requires a stronger, more robust part, you can increase this multiple to three or four times the nozzle diameter, resulting in wall thicknesses of approximately 1.2 mm to 1.6 mm. This range provides a significant boost in durability and impact resistance. However, it’s generally advised not to exceed these values for common plastic materials, as going too thick can introduce the aforementioned issues of excessive material consumption, increased print time, internal stress, and warping. The “magic range” for many standard plastic materials often falls between 0.8 mm and 1.6 mm, offering an optimal balance between strength, printability, and cost-effectiveness.
An additional, critical consideration when applying this multiple-of-nozzle-diameter rule is to always maintain whole number multiples. This means aiming for wall thicknesses that are 2x, 3x, 4x, or more of your nozzle diameter. Attempting to set a wall thickness that is a non-whole multiple, such as 1.5x the nozzle diameter, can lead to undesirable outcomes. In such cases, the slicing software may struggle to perfectly align the extrusion paths, resulting in overlapping layers within the outer walls, uneven extrusion, or even small gaps. These inconsistencies can compromise the structural integrity of the part, negatively affect its surface finish, and often paradoxically slow down the 3D printing process as the printer tries to compensate for these non-standard paths. Sticking to whole multiples ensures cleaner, more predictable, and more efficient tool paths, leading to superior print quality.
Helpful Tools and Techniques for Optimizing Wall Thickness in 3D Printing
Achieving consistent and appropriate wall thickness doesn’t have to be a solitary endeavor. While the initial design phase is crucial, with users needing to consciously consider wall thickness from the outset, especially since not all 3D modeling software explicitly prioritizes this parameter, various tools and techniques can significantly aid the process. This is where 3D printing slicers become indispensable allies.
Modern slicing software such as Cura, PrusaSlicer, and Simplify3D often incorporate sophisticated functions specifically designed to detect and highlight areas where walls are too thin or potentially problematic. These features allow users to identify and rectify design flaws before committing to a print, saving valuable time, material, and preventing costly failures. By performing a virtual “print” through the slicer, users can visualize how their chosen wall thickness will translate into actual extrusion paths, providing an opportunity for adjustments.
Despite general recommendations, there are scenarios, particularly for intricate designs, where walls might need to be thinner than the typical double nozzle diameter. For crafting fine details, intricate patterns, or legible text, slicers offer specialized parameters. The “detect thin walls” or “print thin walls” feature, found in many advanced slicers, enables the printer to lay down walls as thin as a single nozzle diameter. This function is invaluable for capturing minute features that would otherwise be lost or compromised by thicker perimeters. Another powerful feature is “Vase Mode” (also known as “Spiralize Outer Contour”). This mode allows for the creation of hollow objects, like vases, with a single continuous extrusion path for the outer wall, making the wall thickness exactly the width of the printer’s nozzle diameter. Vase mode excels at producing aesthetically pleasing, often watertight prints, by eliminating layer seams and ensuring a smooth, unbroken surface.
Beyond software tools, several other factors can influence the optimal wall thickness. For instance, the presence and configuration of support structures can play a role. If a part has extensive support structures, especially in regions that might otherwise be delicate or prone to stress, it might be feasible to slightly reduce the wall thickness in those areas, as the supports contribute to the part’s overall structural integrity during printing. However, caution is advised, as removing supports from extremely thin walls can itself be a challenging and potentially damaging process. Additionally, printers with higher resolution capabilities, such as those employing SLA/DLP technologies, are inherently able to create parts with significantly thinner walls and finer details compared to FDM printers. While these technologies open up possibilities for intricate designs, it is still crucial to adhere to the minimum thickness requirements for the specific resin or material being used, as even high-resolution processes have limits before structural integrity is compromised.
Ultimately, achieving optimal wall thickness is an iterative process that often involves experimentation, understanding material properties, and leveraging the capabilities of your slicer and printer. By paying close attention to this fundamental parameter, you can significantly enhance the strength, durability, and overall quality of your 3D printed parts, minimizing failures and maximizing the potential of additive manufacturing.
What settings do you typically use for wall thickness in your 3D prints? Do you find that walls that are too thin or too thick pose a greater challenge for your projects? Share your insights and experiences in a comment below or connect with us on our LinkedIn, Facebook, and Twitter pages! Don’t forget to sign up for our free weekly Newsletter here to get the latest 3D printing news delivered straight to your inbox! You can also find all our comprehensive videos on our YouTube channel.
*Cover Photo Credits: Materialise