
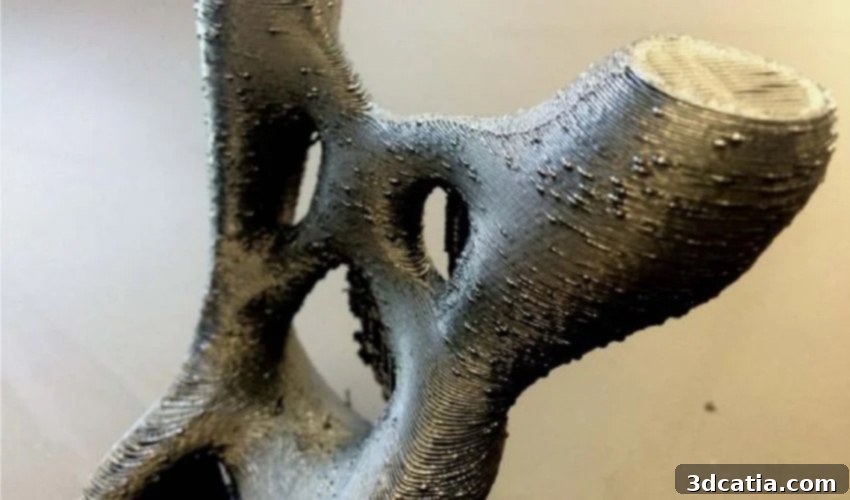
Achieving Flawless Prints: Your Definitive Guide to Eliminating Blobs and Zits in FDM 3D Printing
3D printing, while revolutionizing manufacturing and prototyping, is an intricate process that, like any other, comes with its unique set of challenges and constraints. Enthusiasts and professionals alike often encounter a variety of issues when fabricating parts and complex structures. Common defects include over-extrusion, where too much material is deposited; warping, which sees parts lift from the build plate; and the elephant’s foot effect, where the first layers widen excessively. This comprehensive guide, however, focuses on a specific, often frustrating surface anomaly: blobs and zits.
Blobs and zits, with zits generally being smaller and more pointed, manifest as unsightly spots or droplets of filament on the otherwise smooth surface of 3D-printed objects. Predominantly observed in Fused Deposition Modeling (FDM) or Fused Filament Fabrication (FFF), these imperfections typically appear at points where the extruder pauses, starts, or changes direction, or where it begins and ends a printing pass. Over time, if left unaddressed, these seemingly minor defects can significantly diminish the aesthetic quality, dimensional accuracy, and even the functional performance of your printed parts, turning a potentially flawless creation into a source of frustration.
The appearance of blobs and zits during FDM 3D printing can be attributed to several factors, often interconnected. Understanding these root causes is the first crucial step toward effective troubleshooting and prevention. One primary culprit relates to filament handling, particularly the retraction process. During retraction, a small amount of filament is drawn back into the nozzle. This is a critical function designed to relieve pressure within the hotend, preventing molten plastic from oozing out unintentionally while the print head travels over non-printing areas, thus combatting stringing and unwanted material deposition. However, if the retraction settings are improperly configured—whether too little or too much filament is retracted, or if the retraction speed is too slow or too frequent—these minute excesses or deficiencies in material flow can lead directly to the formation of blobs and zits on the print surface. An insufficient retraction may allow molten plastic to dribble onto the print, forming a blob, while excessive retraction or a poorly calibrated return can create air gaps, leading to inconsistent extrusion that appears as a zit.
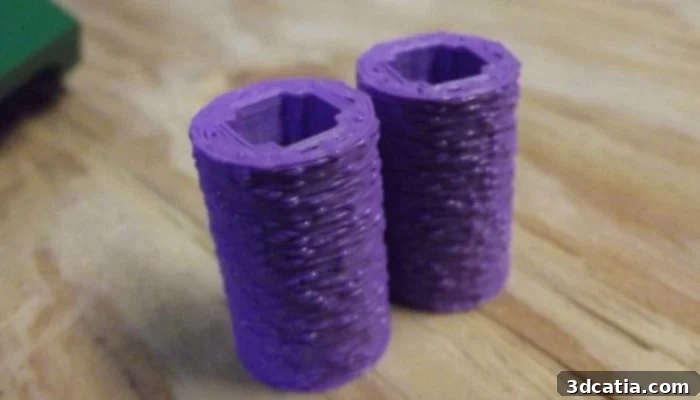
Blobs and zits appear as small droplets of filament on the surface of 3D-printed parts (photo credits: Chris Cecil).
Beyond retraction, the thermal and kinetic dynamics of the extrusion process play a significant role. The nozzle’s temperature and print speed are critical parameters that directly influence the filament’s behavior. An excessively high printing temperature, for instance, can drastically increase the fluidity (reduce viscosity) of the molten material. This makes the plastic more prone to oozing out of the nozzle uncontrollably, especially during non-printing movements or at the beginning/end of print lines, thereby causing prominent blobs. Conversely, a print speed that is either too high or varies erratically across different sections of a print can severely compromise surface quality. Rapid movements can prevent the molten plastic from properly adhering and settling, leading to inconsistent layer deposition and surface irregularities. Lastly, inadequate cooling of the freshly extruded layers is another frequent contributor to these imperfections. If the material does not solidify quickly enough, it can deform, sag, or shift under the pressure of subsequent layers, resulting in uneven surfaces, drips, and ultimately, visible blobs. Now that we’ve pinpointed the common causes, let’s explore a range of practical and effective solutions to banish blobs and zits from your 3D prints.
Fine-Tuning Your Extrusion System: Calibration and Flow Control
Extruder Calibration to Avoid Blobs While 3D Printing
As highlighted earlier, inconsistent or incorrect extrusion rates are a primary factor in the formation of blobs and zits during the 3D printing process. Therefore, the very first step in achieving flawless surfaces is to ensure your extruder is perfectly calibrated. This crucial calibration is typically performed using E-Step Calibration (Extruder Steps Per Millimeter), a fundamental parameter embedded within your 3D printer’s firmware. This setting dictates precisely how many steps the extruder stepper motor must take to push exactly one millimeter of filament through the hotend. If your E-steps are accurately calibrated, your printer will extrude the precise length of filament required by the slicer’s instructions, ensuring consistent and predictable material flow. An under-calibrated extruder will lead to underextrusion, while an over-calibrated one will result in over-extrusion, both of which can manifest as surface defects including blobs and zits.
Once E-steps are dialed in, or if you suspect minor discrepancies in filament diameter that E-steps alone can’t fully compensate for, adjusting the flow rate (sometimes called “extrusion multiplier”) in your slicing software becomes an essential fine-tuning mechanism. This setting allows you to control the volumetric amount of filament extruded as a percentage. By carefully reducing the flow rate in small increments (e.g., 98% or 95% instead of 100%), you can prevent excess material from pooling at the nozzle tip, which is a common precursor to blob formation. This prevents too much material coming out of the nozzle, which can lead to the formation of blobs. Moreover, a frequently overlooked but critical aspect of consistent extrusion is the cleanliness and condition of your 3D printer’s nozzle. A partially clogged or worn nozzle can cause irregular filament extrusion, leading to insufficient, inconsistent, or even erratic material deposition, directly causing imperfections on the surface of your parts. Regularly inspect and clean your nozzle, or replace it if signs of wear are evident, to ensure a smooth and unobstructed flow path for the filament.
Optimizing Retraction Settings for Cleaner Prints
Retraction is a sophisticated function that pulls the filament back slightly from the extruder tip before the print head moves to a new location. Its primary purpose is to relieve the built-up pressure within the nozzle, thereby preventing molten material from oozing out unintentionally during travel moves. While highly effective at combating stringing, an improperly configured retraction can ironically contribute to blobs and zits. The delicate balance of retraction speed, distance, and frequency must be meticulously tuned to achieve optimal results.
The retraction speed is paramount, dictating how quickly the filament is withdrawn into and subsequently reinserted through the hotend. If this speed is too sluggish, the filament won’t be pulled back in time, allowing residual pressure to push material out of the nozzle as it travels, resulting in noticeable blisters or blobs at the start of new extrusion paths. A general guideline to mitigate this is to incrementally increase your retraction speed, perhaps by 25% or in 5-10 mm/s steps, until the blobs diminish without introducing new issues like filament grinding or clogs. However, be cautious not to set it excessively high, as this can cause the filament to snap or grind against the extruder gears.
Another critical parameter to prevent these surface defects is the retraction distance. This setting controls the precise length of filament that is retracted at each instance. If the retraction distance is set too generously, a significant gap can form between the nozzle and the molten filament. This void can allow air to be drawn into the nozzle, leading to an inconsistent prime when extrusion restarts, which then manifests as voids or small zits on the print surface. Conversely, if the retraction distance is too short, the amount of filament retracted will be insufficient to relieve the nozzle pressure effectively, allowing excess material to ooze out and create blobs. To fine-tune this parameter, begin with your printer’s recommended retraction distance and then slowly and gradually increase or decrease it in small increments (e.g., 0.5 mm) while conducting test prints until you find the sweet spot where both stringing and blobs are minimized.
Finally, if persistent blobs remain despite adjusting speed and distance, you might consider strategies to reduce the overall frequency of retractions. Excessive retractions can also contribute to wear on the filament and introduce inconsistent pressure changes. To address this, activate or increase the “minimum retraction distance” or “minimum travel before retraction” setting within your slicer software. This parameter defines the shortest distance the print head must travel before a retraction move is permitted. By increasing this value, you effectively reduce the number of retraction cycles for very short travel moves, thereby decreasing the likelihood of retraction-related blobs and zits without sacrificing stringing prevention on longer travels. Additionally, utilizing settings like “Z-Hop” (lifting the nozzle slightly during travel moves) can sometimes interact with retraction, potentially leaving tiny blobs upon landing, so monitor its effect on your specific printer and filament.
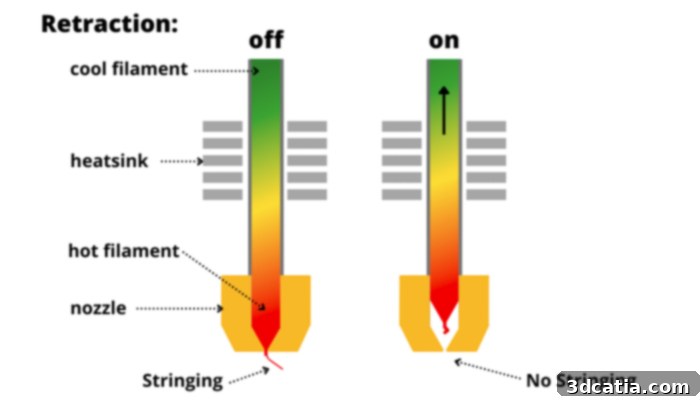
Photo Credits: The 3D Printer Bee
Environmental and Slicer Settings: Temperature, Speed, and Cooling
Reducing Temperature and Speed
The printing temperature is a fundamental setting that profoundly impacts filament viscosity and flow characteristics. If the printing temperature is set too high for a particular filament, the material will become excessively fluid, akin to water, making it difficult to control its flow precisely. This hyper-fluid state significantly increases the chances of uncontrolled oozing and the formation of prominent blobs on the print surface. A good starting point for troubleshooting is to incrementally lower your printing temperature by 5 to 10°C. It’s crucial to remember that optimal printing temperatures vary significantly between different filament types and even brands. For example, ABS typically requires higher temperatures, generally ranging from 230 to 260°C. PETG usually prints best between 210 and 250°C, while PLA, being more forgiving, prefers lower temperatures, typically between 190 and 220°C. Always refer to the filament manufacturer’s recommendations and perform temperature tower tests to find the ideal setting for your specific material and printer combination.
In conjunction with temperature, print speed also plays a critical role in print quality and the occurrence of surface defects. An overly high printing speed can adversely affect both the precision and surface finish of your parts. When the nozzle moves too quickly, the freshly extruded layers of material may not have adequate time to cool and properly solidify before the next layer is deposited. This leads to poor layer adhesion, layer shifting, and uneven, inconsistent surfaces, creating opportunities for blobs and zits to form. To troubleshoot this, initially reduce your print speed by a significant margin, perhaps to a range of 50-70 mm/s or even 30-50 mm/s for intricate details, and then gradually increase it until you discover the optimal print value that balances speed and print quality for your specific design.
Furthermore, to actively combat blistering and surface imperfections, enhancing the cooling of your printed layers is often highly effective. In addition to reducing temperature and print speed, you can significantly increase the ventilation provided by your printer’s part cooling fan. Access your slicer settings and incrementally boost the speed of the part cooling fan, typically in 10% increments (e.g., from 70% to 80% to 90%, up to 100%), observing the effect on blobs. Adequate cooling helps each layer solidify quickly and uniformly, preventing sagging, deformation, and the undesirable accumulation of molten plastic that forms blobs. Ensure your part cooling fan is unobstructed and directed effectively at the nozzle’s extrusion point.
Activate Coasting to Reduce Blobs During 3D Printing
Modern slicer software, such as Cura, PrusaSlicer, and Simplify3D, offers advanced features designed to tackle specific print quality issues. One such invaluable function is “Coasting.” As previously mentioned, pressure can build up within the hotend, causing residual filament to ooze out of the nozzle even after the extruder motor has stopped pushing material. This phenomenon is particularly problematic at the very end of an extrusion line or before a travel move, creating those tell-tale blobs. The coasting function is specifically engineered to mitigate this. It intelligently predicts the internal pressure within the hotend and, just before the end of an extrusion path, it temporarily stops the flow of material for a very short distance while the nozzle continues its path. This allows the built-up pressure to naturally dissipate, using the remaining pressure to complete the line without actively extruding new filament, thereby preventing the unwanted expulsion of molten plastic that causes blistering and blobs. To leverage this feature, simply locate and activate the “Coasting” setting within your preferred slicing software and experiment with its parameters (such as ‘Coasting Volume’ or ‘Coasting Distance’) to find the optimal balance for your prints.
Advanced Strategies and Final Tips for Impeccable Surfaces
Beyond the core solutions, considering how your slicer handles seam placement can also significantly impact the visibility of blobs and zits. By default, slicers often place the layer start/end points (the “seam”) randomly or aligned. If random, blobs will be scattered across the surface. If aligned, they form a noticeable vertical line. Experiment with different “Seam Position” settings in your slicer. Options like “Sharpest Corner,” “Rear,” or “User Specified” can help hide these minor imperfections in less conspicuous areas or corners, making them virtually invisible on the final print. Some slicers also offer “Wipe” settings, which slightly move the nozzle after completing an extrusion path but before lifting or retracting. This can help to wipe away any residual ooze, preventing blobs at the seam.
Ensuring your filament is dry and stored correctly is another critical, often overlooked, aspect of print quality. Moist filament can boil in the hotend, creating tiny steam bubbles that result in inconsistent extrusion, popping sounds, and a noticeable degradation in surface finish, often appearing as small bumps or zits. Always store filament in a dry, airtight container with desiccant. If you suspect your filament has absorbed moisture, consider using a filament dryer before printing.
By systematically addressing the causes—from precise extruder calibration and optimized retraction settings to managing printing temperatures, speeds, and cooling, and leveraging advanced slicer features like coasting and seam placement—you should now be well-equipped to enjoy smooth, flat, and aesthetically pleasing surfaces on your 3D printed parts. Achieving truly flawless prints often requires a bit of patience, experimentation, and a methodical approach to troubleshooting. Keep a log of your settings and results to quickly identify what works best for each filament and design.
Have you already encountered frustrating blobs and zits in your 3D printing journey? What solutions have you found most effective? Share your insights and experiences in a comment below or join the discussion on our LinkedIn, Facebook, and Twitter pages! Don’t forget to sign up for our free weekly newsletter here for the latest 3D printing news straight to your inbox! You can also find all our videos and expert tutorials on our YouTube channel.
*Cover Photo Credits: re3D