
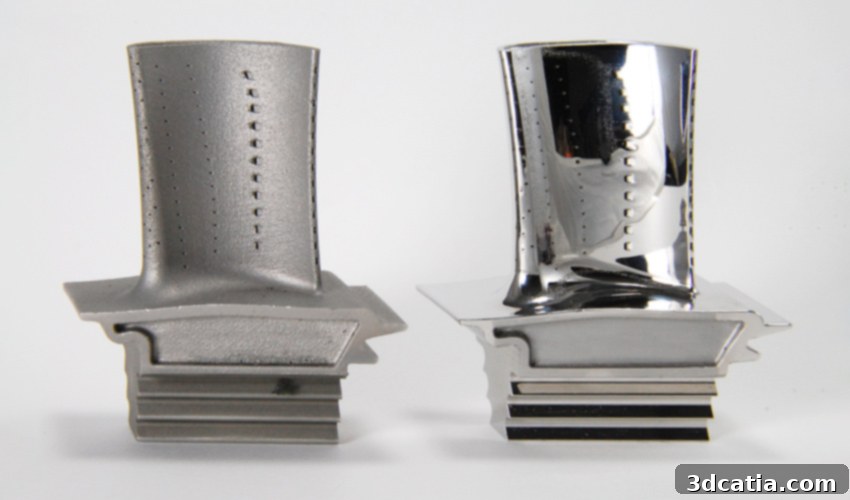
Achieving Flawless Finishes: Essential Surface Finishing Techniques for 3D Printed Parts
In recent years, additive manufacturing, widely known as 3D printing, has undergone a remarkable transformation. It has evolved from a niche technology primarily used for rapid prototyping into a sophisticated, increasingly industrial method capable of producing functional, end-use components across a multitude of sectors. While the benefits of 3D printing — including unparalleled design freedom, rapid iteration cycles, and the ability to customize production – are extensive, the technology on its own rarely delivers parts of professional-grade quality straight out of the printer. Raw 3D printed parts often exhibit visible layer lines, surface roughness, or a lack of desired mechanical properties. To overcome these inherent limitations and achieve high-quality final models that meet stringent aesthetic, functional, and performance standards, various post-processing techniques are indispensable. Among these, surface finishing plays a critical role in enhancing both the appearance and the utility of 3D printed objects.
A comprehensive understanding of post-processing is paramount for anyone involved in additive manufacturing. We have previously provided an introduction to post-processing in 3D printing, including a detailed look at the importance of cleaning 3D printed parts. Building upon that, it’s equally essential to address the surface roughness of these parts, which varies significantly depending on the material and specific 3D printing technology employed. Today, we delve deeper into this crucial aspect, offering a complete guide to surface finishing in 3D printing. These specialized treatments are frequently necessary to transform the appearance of a raw part, achieve perfectly smooth surfaces, precisely adjust its size and shape, or significantly improve its service life and functional performance under diverse conditions. Mastering these techniques is key to unlocking the full potential of additive manufacturing for high-value applications.
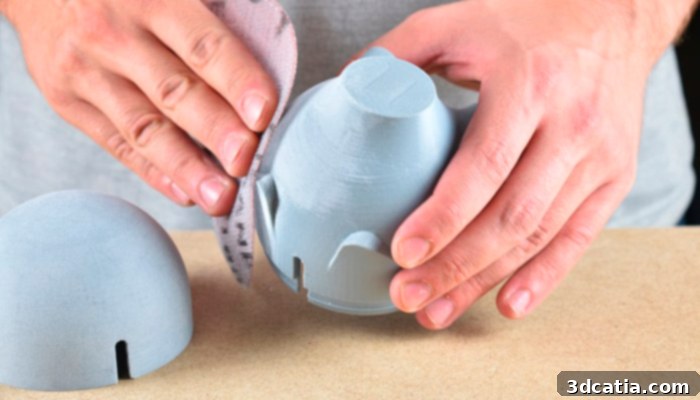
Sanding, one popular method of surface finishing for 3D printing parts, can be done manually, although automatic tools are also available.
Surface Sanding for Smoothness and Enhanced Adhesion
One of the most fundamental and widely used methods for refining the surface of 3D printed parts, particularly those created by extrusion methods such as Fused Deposition Modeling (FDM), is sanding. Parts produced by these techniques often display visible layer lines, stair-stepping effects, and other minor surface imperfections that can compromise their aesthetic appeal and tactile quality. Sanding involves the systematic use of abrasive materials, most commonly sandpaper, which is available in various grit sizes. The primary objective is to meticulously abrade and remove these surface defects, including prominent layer lines and small protrusions, thereby creating a uniform, smooth, and blemish-free finish. This technique is especially critical when any subsequent coating, such as paint, primer, or protective sealant, is to be applied to the surface, as a properly sanded and smooth surface is paramount for optimal adhesion, an even application, and a high-quality final appearance.
The sanding process typically commences with coarser grit sandpaper (e.g., 80-150 grit) to effectively and rapidly remove significant imperfections and pronounced layer lines. Subsequently, the operator progresses to successively finer grit sandpaper (e.g., 220, 400, 800, 1000, and even up to 2000+ grit for a highly polished look) to incrementally refine the surface, resulting in an increasingly smoother and more uniform texture. However, extreme caution is necessary during sanding to prevent inadvertently altering or damaging the intricate geometry of the 3D printed model, particularly on thin walls, sharp edges, or delicate features. A notable drawback of manual sanding is the inherent difficulty in reaching and uniformly finishing complex internal geometries, small holes, tight corners, and undercuts, which can lead to inconsistencies in the final surface. Manual sanding is also a labor-intensive and time-consuming process, especially for larger parts or batches of components. To mitigate these challenges and enhance efficiency, various automatic sanding tools and machinery are available on the market, ranging from vibratory sanders to robotic systems. These automated solutions are designed to standardize and accelerate the sanding process, making it more scalable and consistent for industrial and higher-volume production environments, while reducing reliance on manual labor.
Shot Peening and Bead Blasting: Enhancing Durability and Aesthetics in Metal Parts
Shot peening and bead blasting are two widely recognized and effective techniques utilized for surface finishing in 3D printing, predominantly employed in the post-processing of metal parts. These methods are commonly applied to a diverse range of metal components, including those made from aluminum alloys, various types of steel, titanium, copper, and other high-performance metals. Both processes are instrumental in improving a part’s strength, durability, and overall performance. However, it is crucial to understand that they achieve these enhancements through distinct mechanisms and are typically chosen for different primary objectives, making the distinction between them vital for appropriate application selection.
Shot peening is a controlled cold working process that involves bombarding the surface of a part with small, spherical media, such as metal or ceramic spheres. These projectiles are propelled at high velocity, typically using compressed air or centrifugal force, against the part’s surface. The impact of these tiny spheres generates controlled plastic deformation in the outermost layer of the material. This deformation introduces beneficial compressive residual stress into the surface, which is highly effective in improving the part’s fatigue strength and resistance to stress corrosion cracking. By counteracting tensile stresses that can initiate cracks under cyclic loading, shot peening significantly reduces the likelihood of crack formation and propagation, thereby enhancing overall durability. Additionally, shot peening can improve corrosion resistance and optimize the adhesion of subsequent coatings. This makes it an ideal technique for critical components subjected to demanding mechanical stresses or harsh operating environments, such as aerospace components, automotive gears, and high-performance springs, where extended lifespan and reliability are paramount.
Conversely, bead blasting, often referred to as media blasting or abrasive blasting, employs a stream of small beads made from materials such as glass, metal, plastic, or other abrasive compounds. Unlike shot peening, which aims to induce plastic deformation for structural benefits, bead blasting is primarily used to clean, polish, or texture the surface of a part. The process involves propelling these beads against the surface to remove contaminants, scale, burrs, or to create a specific matte, satin, or textured finish. Instead of causing deep plastic deformation, bead blasting gently removes the top layer of material. This effectively smooths out surface irregularities, eliminates dirt, rust, or corrosion, and prepares the surface for subsequent treatments like painting, anodizing, or electroplating. It is particularly effective for achieving a uniform, aesthetically pleasing surface finish and improving the consistency of appearance across multiple parts. While it may offer some minor surface hardening, its main purpose is cosmetic enhancement and surface preparation rather than structural improvement.
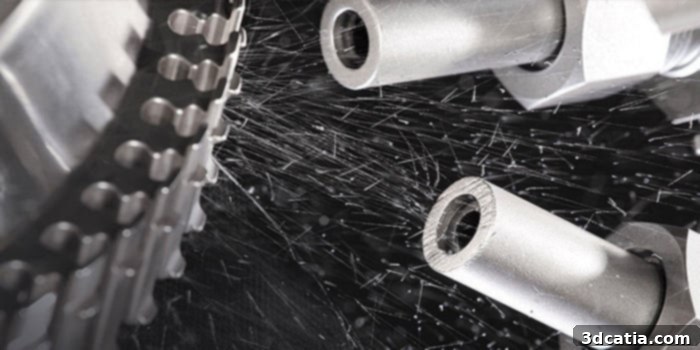
The main difference between shot peening and bead blasting is fundamental: shot peening generates beneficial plastic deformation and compressive residual stress on the part’s surface, which significantly improves its final strength, fatigue life, and overall durability. Bead blasting, on the other hand, primarily smoothes, cleans, or textures the top layer of the material, improving the aesthetic appearance and preparing the surface for subsequent functional or decorative coatings. These robust post-processing techniques are particularly useful for 3D printed metal parts that will be subjected to significant mechanical stresses, strains, or critical environmental conditions. Examples include gears, springs, turbine components, and structural parts of aircraft and vehicles, where ensuring optimal material performance and surface integrity is non-negotiable for safety and operational efficiency.
Polishing Methods in 3D Printing: Vibratory Finishing and Tumbling
Unlike several of the previously discussed methods, which often involve individual part treatment, vibratory finishing and tumbling are highly efficient mass finishing processes designed to simultaneously process multiple 3D printed objects. These techniques offer significant advantages in terms of time and cost savings when dealing with high volumes of parts, making them ideal for batch production. While they might appear superficially similar, vibratory finishing and tumbling (also sometimes known as barrel tumbling or rumbling) employ distinct mechanisms and are optimized for different applications, each providing unique benefits for achieving specific surface finishes. Both technologies involve placing 3D printed parts into a specialized container – either a vibratory bowl or a rotating drum – alongside an abrasive media and a liquid compound. The continuous motion of the container, whether vibrating or tumbling, causes the parts and media to gently rub against each other. This friction removes burrs, smooths surfaces, and gradually refines the part’s finish. The ultimate choice between these two methods depends critically on the specific requirements of the part, including its geometry, material composition, and the precise surface finish desired.
Vibratory finishing utilizes a vibratory bowl or tub where parts, abrasive media, and a liquid compound are subjected to high-frequency vibrations. This constant agitation causes the entire mass to gently rub against itself, creating a uniform, continuous friction across all accessible part surfaces. This method is generally considered more suitable for achieving a smoother, more homogeneous, and consistent surface finish. The uniform distribution of material removal makes vibratory finishing ideal for larger parts, components with more delicate features, or those with rounded edges that do not possess extremely intricate details. The consistent vibratory motion ensures that the abrasive media reaches most surfaces evenly, minimizing impingement damage and providing a highly controlled finish. Furthermore, vibratory finishing is typically a faster technique compared to tumbling, often achieving desired results in a matter of hours. This makes it highly efficient for medium to high-volume production runs where speed and consistency of surface quality are paramount. It is frequently preferred for parts that demand a high degree of surface uniformity and reduced surface roughness.
Conversely, tumbling, or barrel finishing, involves placing parts, abrasive media, and compound into a rotating barrel. As the barrel rotates, the parts and media tumble and cascade over one another, generating a more aggressive rubbing and abrasive action. This method is often better suited for smaller, more robust, and less delicate parts, particularly those requiring more significant material removal, deburring, or edge rounding. The centrifugal cylinder system in tumbling applies a smoother, yet often more intense, abrasive action compared to the gentle vibration. While tumbling can produce excellent finishes, it typically requires a longer processing time than vibratory finishing—ranging from a few hours to several days—to achieve high-quality surfaces. This duration depends heavily on the desired finish intensity, the part material, and the chosen abrasive media. Its strength lies in its ability to effectively process intricate or numerous small components, offering a cost-effective solution for improving surface integrity and appearance where processing time is less critical. For both methods, careful selection of the abrasive media (e.g., ceramic, plastic, steel, or organic media) and liquid compounds is essential to prevent damage, achieve the desired finish, and ensure optimal performance without causing imbalances or uneven finishes.
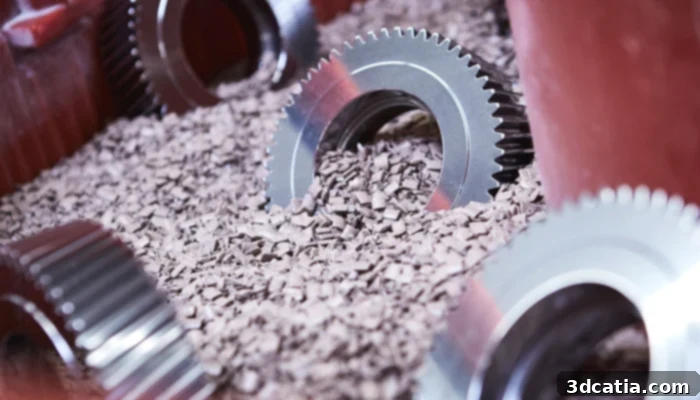
This post-treatment technique can be used on both metal and plastic parts.
In summary, both vibratory finishing and tumbling are highly effective mass finishing methods for the post-processing of a wide array of 3D printed parts, suitable for both metal and plastic materials. They distinguish themselves primarily through their type of motion (vibration versus rotation), processing speed, the specific characteristics of the surface finish they impart, and their suitability for various part geometries and levels of detail. When implementing these techniques, meticulous care must be taken in selecting and combining different types of abrasive media. Incorrect combinations can lead to an imbalance in the processing action, resulting in an uneven finish, suboptimal results, or even potential damage to the parts being processed. Therefore, a thorough understanding of the nuances of each method, along with careful process control, is paramount for consistently achieving high-quality and desired surface finishes in additive manufacturing applications.
Vapor Smoothing for a Pristine, Sealed, and Glossy Finish
Vapor smoothing stands out as an advanced chemical post-processing method designed to achieve exceptionally smooth and often glossy surfaces on 3D printed parts. The primary distinction of this technique is that the resulting finish is typically shiny and uniform, rather than the matte finish often associated with mechanical abrasion. This process leverages a gaseous solvent to delicately melt and reflow the surface of the component until it achieves a uniform, flawless texture. The process typically unfolds within a controlled vapor chamber where 3D printed parts are exposed to a carefully heated and circulating solvent vapor. This vapor gently condenses on the part’s surface, initiating a controlled dissolution and reflow of the outer polymer layer. Once the desired level of smoothness and gloss is attained, the parts are typically transferred directly into a cooling chamber. This rapid cooling halts the liquefaction (more accurately, the softening and controlled melting) process, which is crucial for ensuring that only the surface is affected and that the desired shape and dimensional integrity of the object are precisely maintained.
Beyond its significant aesthetic enhancements, the vapor smoothing process offers substantial functional advantages. By reflowing the material, it effectively fills microscopic pores, voids, and tiny crevices on the outside of the object, thereby sealing the surface comprehensively. This pore-filling capability makes vapor-smoothed parts remarkably effective for applications requiring watertight or airtight properties, enabling them to reliably contain liquids or gases without leakage. Furthermore, this process can improve certain mechanical properties of the part, such as increased impact strength, ductility, and flexibility, while also creating a more hygienic and easier-to-clean surface, which is particularly beneficial for medical or food-contact applications. While vapor smoothing technology is compatible with a wide array of thermoplastics, including popular materials like ABS, ASA, and PA (Nylon), it is essential to acknowledge that it cannot be universally applied to all plastics. Certain materials may react adversely with the solvent, potentially leading to harmful chemical reactions, material degradation, or undesirable dimensional instability. Incompatible plastics frequently include high-performance polymers such as polycarbonate (depending on the specific post-processing machine and solvent formulation), polyphenylsulfone (PPSF), ULTEM 1010, and ULTEM 9085, as their chemical structures may not respond predictably or favorably to the solvent vapor, leading to compromised part integrity.
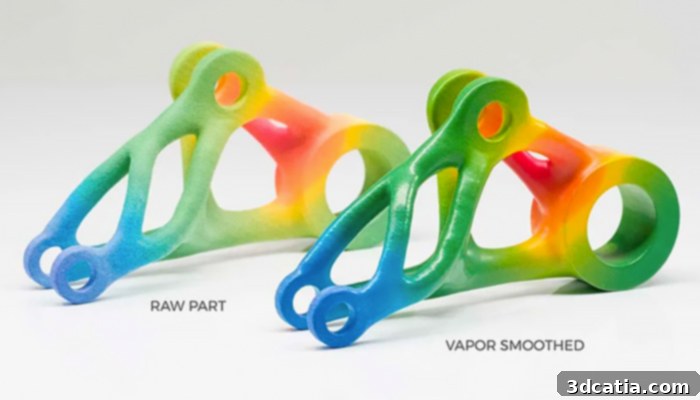
Comparison between the raw part and the part after steam smoothing (photo credits: AMT)
An intriguing alternative to vapor smoothing, especially for specific applications or very large components, is solvent dipping. As the name explicitly implies, this method involves directly immersing 3D printed parts into a liquid solvent, rather than exposing them to vaporized chemicals. While the resulting surface finish can be quite similar to that achieved with vapor smoothing in terms of smoothness, solvent dipping presents its own set of unique challenges. The direct and often aggressive contact with the liquid solvent means it acts more rapidly and intensely on the material, making it considerably more difficult to maintain precise dimensional accuracy and control the exact degree of surface dissolution. Parts must be meticulously monitored and removed promptly from the solvent bath to prevent excessive material loss, deformation, or weakening of the part’s structure. However, this method can be particularly advantageous for very large parts that might exceed the physical capacity of standard vapor chambers, or for situations where a rapid, albeit less controlled, surface treatment is acceptable. Careful material selection, precise timing, and extensive process optimization are absolutely crucial for achieving successful and consistent results with solvent dipping, highlighting the need for thorough testing before its full-scale implementation.
Epoxy Resin for Surface Finishing: Enhancing Durability through Coating and Infiltration
Epoxy resins represent a highly versatile class of reactive polymers, distinguished by their exceptional adhesive properties, robust chemical resistance, and impressive structural strength. These resins are chemically characterized by the presence of epoxide groups – three-membered cyclic ethers containing two carbon atoms and one oxygen atom – which enable them to form strong, highly cross-linked polymer networks upon curing. When applied to 3D printed parts as a surface finishing method, these resins provide a durable, sealed surface, rendering the part effectively airtight and watertight. Beyond sealing, epoxy treatments significantly enhance a part’s resistance to high temperatures, various aggressive chemicals, and abrasive wear. This makes epoxy finishing an ideal solution for 3D printed components that are destined to face harsh operating conditions or environments where chemical exposure, mechanical stress, and overall durability are critical. Typically, there are two primary methods for applying epoxy resins to 3D printed parts: direct coating and vacuum infiltration, each with its own set of advantages, limitations, and suitable applications.
Epoxy coating is most frequently applied manually, often utilizing brushes, spatulas, or by carefully dipping smaller parts. This hands-on approach offers a notable cost advantage by eliminating the need to purchase expensive specialized equipment, making it an accessible option for smaller workshops, custom projects, or hobbyists. However, this method is considerably more labor-intensive and time-consuming, requiring skilled application to ensure an even, consistent, and defect-free finish. It is particularly well-suited for small production runs, individual custom components, or items where only specific, accessible portions of their surface require sealing, strengthening, or aesthetic enhancement. A significant limitation of manual epoxy coating is its inability to effectively access internal channels, intricate undercuts, or deeply recessed features, which inevitably remain untreated. Furthermore, for parts demanding very precise dimensional tolerances, manual epoxy coating may not be the optimal choice, as the added layer of resin will inherently increase the part’s overall thickness, potentially affecting critical fits or assemblies. Despite these limitations, for external aesthetic improvement, basic surface sealing, or achieving a stronger outer shell on simpler geometries, manual epoxy coating remains a viable and popular choice due to its simplicity and low entry cost.
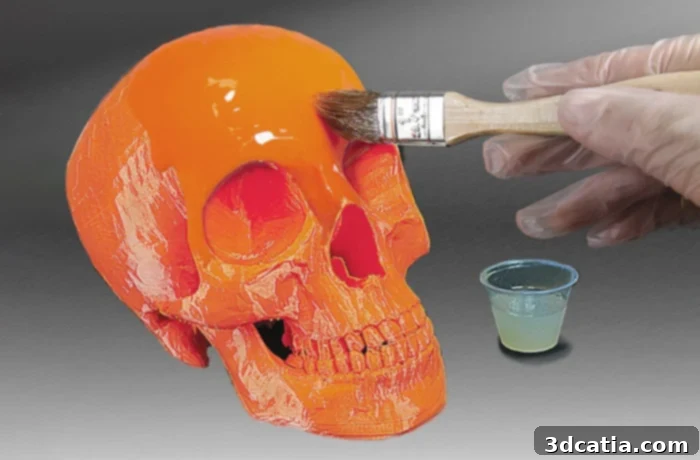
An example of manual coating of epoxy resin
Conversely, the epoxy infiltration system is specifically engineered to counteract many of the accessibility and uniformity limitations encountered when applying epoxy resin by hand, offering a far more comprehensive and efficient treatment for complex and porous geometries. In this advanced method, the 3D printed part is completely immersed in a liquid epoxy resin. Subsequently, a vacuum chamber is employed to evacuate air from within the part’s internal pores, channels, and intricate structures. This vacuum process draws the epoxy resin deep into the object, ensuring thorough impregnation and complete filling of all voids. This results in an exceptionally robust and uniformly sealed part, even in areas that would be utterly inaccessible by manual methods. The entire process, encompassing vacuum impregnation and subsequent curing (often requiring an oven to accelerate the cross-linking and hardening of the resin), typically takes approximately three hours to complete. While significantly less labor-intensive per part and much faster for processing larger components or batches, the primary disadvantage of infiltration compared to manual coating is its higher upfront investment cost. It necessitates specialized equipment, including a robust vacuum chamber and a precisely controlled curing oven, in addition to the cost of the epoxy resin itself. However, for applications demanding superior internal sealing, enhanced mechanical properties throughout the part’s volume, or the processing of complex, inherently porous geometries, epoxy infiltration provides an unparalleled level of part improvement, durability, and functional integrity.
The Indispensable Role of CNC Machining in 3D Printing Post-Processing
In the rapidly advancing landscape of modern manufacturing, the synergistic relationship between additive and subtractive technologies is becoming increasingly crucial. Rather than being seen as competing methodologies, these approaches are often complementary, allowing manufacturers to harness the distinct benefits of both. Among the most well-known and precise subtractive manufacturing systems is Computer Numerical Control (CNC) machining. While not strictly a traditional post-processing method in the context of surface treatment alone, CNC machining plays an indispensable role as a critical resource for achieving superior surface finishing, extreme precision, and exacting dimensional accuracy in 3D printed parts. This integration is particularly vital when stringent dimensional tolerances, incredibly smooth finishes, or the addition of highly precise features are required on additively manufactured components. This hybrid approach is especially pertinent for certain additive manufacturing technologies, such as Direct Energy Deposition (DED) and specific metal binder jetting processes.
In additive manufacturing processes like DED, where metal powder or wire is melted and deposited layer by layer, the resulting “as-printed” parts often exhibit a very rough surface finish. Furthermore, they can possess significant dimensional deviations and require features like precision holes or mating surfaces. This inherent roughness, coupled with potential inaccuracies and the desire for high-quality interfaces, necessitates a subsequent finishing step. Therefore, a CNC machining operation is almost always a mandatory step for DED-produced parts to achieve the desired smooth, highly defined surface, precise geometric features, and critical dimensional accuracy. CNC machines are capable of precisely removing material from the 3D printed component with sub-millimeter accuracy, creating perfectly flat surfaces, drilling accurate holes with tight tolerances, or machining precise interfaces that are difficult or impossible to achieve with additive manufacturing alone. Recognizing this powerful complementary relationship, a growing number of hybrid manufacturing solutions are now readily available on the market. These innovative systems integrate both additive manufacturing capabilities (e.g., DED for building the core part) and subtractive CNC machining capabilities within a single, unified machine. This integration significantly streamlines the entire production workflow, minimizing part handling, reducing overall production time, and ensuring that parts are built and finished to exacting specifications in one continuous process. This leads to the production of higher quality, more efficient, and often more complex, high-performance components than either technology could achieve independently.
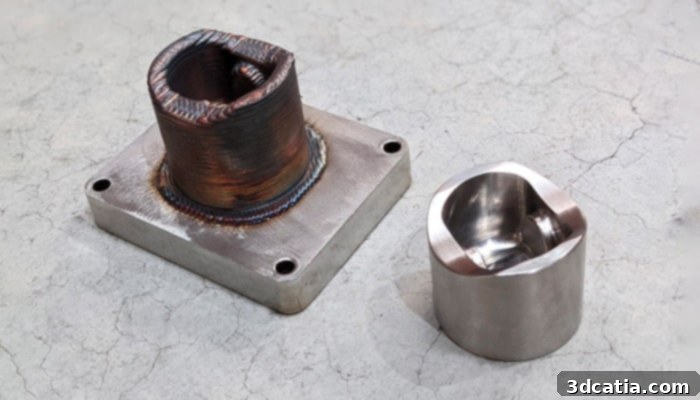
On the right, the part after CNC machining (photo credits: Meltio)
The strategic integration of CNC machining into the 3D printing post-processing workflow represents a powerful and increasingly common approach to unlock the full potential of additive manufacturing for demanding, high-performance applications. By selectively applying subtractive processes, manufacturers can effectively overcome the inherent surface finish and tolerance limitations of raw 3D prints. This hybrid methodology delivers parts that combine the geometric complexity, material efficiency, and design freedom of additive manufacturing with the unparalleled precision, superior surface quality, and tight tolerances typically associated with traditional machining. This approach is particularly impactful for industries such as aerospace, medical device manufacturing, and automotive, where both intricate designs and robust, high-tolerance finishes are non-negotiable requirements for critical components. The ability to precisely refine and finish 3D printed parts through CNC machining ensures that these components not only meet their functional specifications but also achieve the aesthetic and performance standards expected in high-value, safety-critical engineering applications, pushing the boundaries of what is possible with advanced manufacturing.
Exploring the diverse array of surface finishing methods for 3D printing clearly reveals that achieving optimal part quality is a nuanced and often multi-step process. The ideal technique—or more commonly, a strategic combination of techniques—is always dictated by a careful consideration of the specific material used, the 3D printing technology employed, the desired aesthetic outcome, and, critically, the functional requirements and performance expectations of the final part. Whether the goal is to significantly enhance mechanical strength, drastically improve visual appeal, ensure airtight sealing, or achieve critical dimensional accuracy, a thorough understanding of these post-processing steps is absolutely vital for anyone aiming to produce professional-grade 3D printed components. We hope this comprehensive guide has illuminated the vast possibilities and intricate details of surface finishing in additive manufacturing, empowering you to achieve superior results. What are your thoughts on these various methods for perfecting 3D prints? We invite you to share your experiences, insights, and questions in a comment below or join the vibrant conversation on our LinkedIn, Facebook, and Twitter pages! Don’t forget to sign up for our free weekly Newsletter here to receive the latest 3D printing news and industry updates directly to your inbox! You can also find all our engaging videos and educational content on our YouTube channel.
*Cover Photo Credits: EOS