
Robo C2 3D Printer Review: Unboxing, Setup, and Performance for the Modern Maker
Robo 3D, an innovative American 3D printer manufacturer headquartered in sunny California, first captured the attention of the global additive manufacturing community in 2013 with the groundbreaking launch of their original Robo C1 3D printer via a highly successful Kickstarter campaign. This initial foray established Robo 3D as a player focused on accessible and user-friendly desktop 3D printing. Building on this momentum, the company returned to Kickstarter in late 2016 for the highly anticipated release of their next-generation machines: the Robo C2 and its larger sibling, the R2. This second campaign proved even more triumphant, shattering its initial $100,000 goal and ultimately raising an impressive $382,027 from eager backers worldwide. This overwhelming support underscored the significant demand for reliable, affordable, and feature-rich 3D printers that could appeal to both beginners and experienced enthusiasts alike.
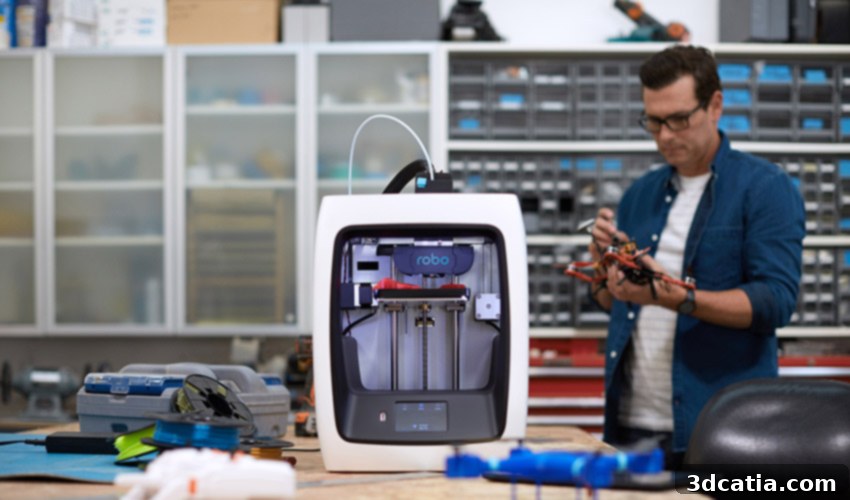
At Lab 3Dnatives, our continuous interest in evaluating the latest innovations in 3D printing led us to take a closer look at the Robo C2. Positioned as a plug-and-play entry-level model, the C2 arrived on the market with a retail price of €959, aiming to offer an accessible gateway into the world of 3D printing without compromising on core functionalities. This iteration of the Robo C2 marked a complete design overhaul compared to its predecessor, boasting a sleek, modern aesthetic characterized by a curved white shell that seamlessly integrates into various environments, from a professional workshop to a home office. User interaction is facilitated through a vibrant 3.5-inch full-color touchscreen, providing intuitive control over the printing process. Underneath its stylish exterior, the C2 offers a respectable build volume of 127 x 127 x 152.4 mm, capable of producing detailed prints with a minimum layer height of 20 microns. Furthermore, its maximum print speed of 16 mm3/s ensures efficient production, balancing speed with precision.
Given its competitive price point under €1,000, a critical question arose during our initial assessment: how would the Robo C2 balance performance with affordability? Would the pursuit of an attractive price tag necessitate a sacrifice in overall print quality or, crucially, in the user experience? More broadly, we sought to understand the intended audience for this machine. Was it designed for educational institutions, aspiring hobbyists, small businesses, or simply anyone looking for a reliable and easy-to-use desktop 3D printer? Our comprehensive tests at the 3Dnatives lab aimed to answer these questions, providing an in-depth look at every aspect of the Robo C2, from its unboxing to its final print performance, ensuring a thorough evaluation for our readers.
1. Unpacking the Robo C2: First Impressions and What’s Inside
The unboxing experience of the Robo C2 immediately hints at the brand’s commitment to user convenience and protection during transit. The printer arrives securely encased within two robust blocks of polystyrene, intelligently linked by a clip-on strap – a thoughtful design feature also observed in premium machines like those from Ultimaker. This simple yet effective mechanism significantly simplifies the process of lifting the printer out of its cardboard packaging, preventing awkward struggles and ensuring a smooth start to your 3D printing journey. Upon removal, the Robo C2’s compact dimensions of 331 x 305 x 464 mm and a manageable weight of less than 10kg become evident. This portability places it firmly in the category of desktop 3D printers designed for flexibility and ease of placement, comparable in size and weight to popular models such as the UP Mini 2, a MakerBot Replicator Mini +, or a Ultimaker 2 Go (though the original text confusingly mentions “2 GB Ultimaker”). Its lightweight nature makes it ideal for educational settings, small studios, or even a living room, where space and ease of movement are often prime considerations.
Beyond the printer itself, the Robo C2 comes accompanied by a thoughtfully curated selection of accessories, indicating that the brand has focused on providing the essentials without unnecessary clutter. These include two spool supports, designed to accommodate various filament sizes, alongside a USB key for convenient file transfer. A 750g coil of PLA filament is supplied, allowing users to begin printing immediately after setup. To ensure stable operation and minimize vibration, a set of anti-vibration pads is included. Maintenance tools such as a lubricant for the two axes and two Allen keys for minor adjustments are also part of the package. Finally, a clamp for post-treatment is provided, a small but useful addition for finishing printed models. Before powering up the machine for the first time, it’s crucial to remove a protective cover located under the printing plate and any protective pads or ties securing the extruder, standard practice to prevent damage during shipping and ensure proper functionality.
2. Setting Up the Robo C2 3D Printer: From Box to First Print
The setup process for the Robo C2 is designed to be straightforward, aligning with its “plug & play” philosophy. Once the printer has been carefully removed from its packaging and all shipping fixings on the axes have been removed – a critical step often overlooked – the initial physical assembly is minimal. Users simply need to attach the provided spool holder to the designated slot and add the filament coil. The printing plate, crucial for successful adhesion, is effortlessly fixed into place using four powerful magnets located underneath, ensuring a secure and level print surface. However, a significant point to note is that this printing plate is not heated. This characteristic inherently limits the range of materials compatible with the Robo C2 primarily to PLA filaments, as other materials like ABS require a heated bed to prevent warping and ensure proper layer adhesion. While PLA is an excellent starting point due to its ease of use and environmental friendliness, users looking to experiment with more advanced engineering filaments might find this a limiting factor.
With the physical setup complete, the next step involves powering on the machine using the easily accessible ON/OFF button located on the back. The printer’s interface defaults to English, making navigation intuitive for most users. Before embarking on your first print, a few essential operations are required, all guided by the C2’s user-friendly touchscreen interface. First, connecting the printer to your WiFi network is highly recommended, as it unlocks features like remote printing and monitoring, though direct file transfer via the included USB stick remains an option. Second, a semi-automatic calibration of the Z-axis is necessary. This process typically involves passing a thin card or feeler gauge between the nozzle and the print bed, allowing the printer to precisely determine the correct nozzle-to-bed distance, a critical factor for achieving good first layer adhesion and print quality. The C2 also offers a more comprehensive calibration option that covers multiple other points on the print bed, catering to users who desire even greater precision. Finally, loading the filament is a remarkably simple process; the printer’s intuitive design and integrated end-of-filament detector (a widely appreciated feature) streamline this step, making material changes hassle-free and preventing print failures due to unexpected material depletion.
3. Cura for Robo Software & Enhanced Connectivity Features
The Robo C2 operates using standard .gcode files, offering broad compatibility with a wide array of slicing software available on the market. While many programs can generate these files, Robo 3D specifically recommends using Cura for Robo for Windows users or Classic Cura for Mac users. This recommendation stems from Cura’s user-friendly interface, robust feature set, and the pre-configured profiles tailored for optimal performance with Robo 3D printers. Within Cura, users can effortlessly import their 3D models (typically in STL or OBJ format), manipulate them for desired orientation and scaling, and then configure crucial printing parameters such as layer height, infill density, print speed, and support structures. Once sliced, the .gcode file can be transferred to the printer either directly via the integrated WiFi connection (for seamless wireless workflow) or by loading it onto the included USB stick. A particularly convenient feature of the Robo C2 is its internal memory, which allows it to store multiple 3D models. This is immensely beneficial for users who frequently print the same object, eliminating the need to re-transfer files repeatedly.
Further enhancing the user experience, the Robo C2 integrates advanced connectivity options, notably through its dedicated mobile application. This app, currently available for iPhones and iPads, provides an unparalleled level of control and monitoring capabilities directly from your smart device. While Android users might feel left out for now, the iOS app offers a comprehensive suite of features. Users can remotely manage the printer’s motors, precisely set up 3D files before printing, and even initiate prints from anywhere with an internet connection. Once a print has commenced, the app provides live control and monitoring, allowing users to pause, adjust settings, or cancel prints if needed. The Robo R2, the C2’s larger counterpart, takes this a step further by including an onboard camera, enabling users to visually track the progress of their prints in real-time through the mobile app. While the C2 lacks this camera, its remote management features still significantly enhance convenience, allowing users greater flexibility in managing their printing tasks and integrating 3D printing more smoothly into their daily routines.
4. Print Performance and First Impressions: Quality Meets Quiet Operation
During our extensive testing of the Robo C2, we subjected the printer to a series of rigorous evaluations, including challenging benchmark models and everyday objects. The results, as displayed in the series of prints below, were generally impressive for a printer in its class. When tackling the infamous “torture test,” designed to push the limits of a 3D printer’s capabilities regarding overhangs, bridges, and fine details, the Robo C2 performed admirably with no significant concerns regarding structural integrity or general adhesion. For these tests, we primarily utilized the blue and red PLA filaments generously provided by the brand. The overall print quality was consistently clean, exhibiting good layer adhesion and respectable detail resolution. However, we did observe a slight tendency towards filament warping on some larger, flatter prints. This phenomenon, where the edges of a print lift from the print bed, is a common challenge in FDM 3D printing, especially with unheated beds. We found that by meticulously calibrating the machine regularly and leveraging Cura’s “best settings” – which often include adjustments like adding a brim or raft, or fine-tuning initial layer speed and temperature – these minor warping issues could be significantly mitigated, leading to even more flawless results.
Beyond raw print quality, the Robo C2 truly shines in its operational characteristics. During daily use, we consistently noted the machine’s remarkably quiet operation. This low noise level is a significant advantage, allowing the printer to integrate seamlessly into various environments without causing disturbance. Whether placed in a busy workshop, a quiet classroom, or even a home living room, the C2 maintains a discreet presence, a characteristic highly valued by users who prefer to print without the constant hum and whir often associated with 3D printers. This quietness, combined with its compact size and sleek design, makes the Robo C2 an excellent choice for educational settings, small offices, or personal use where minimal footprint and noise are paramount. The consistent performance, coupled with thoughtful design and quiet operation, positions the Robo C2 as a highly capable and user-friendly desktop 3D printer.
Elephant in 200 micron layers without supports, showcasing basic print quality.
The White House by Makerbot in 150 microns, demonstrating detail resolution.
The “torture test” by Makerbot in 200 microns without supports, evaluating printer limits.
3DBenchy by Creative Tools in 150 microns, a standard benchmark for print quality.
SPIRAL Vase by YSoft_be3D in 150 microns without supports, showing smooth vertical surfaces.
Bust of Sappho by LukeChilson in 150 microns with brackets, highlighting support structure removal.
5. Who is the Robo C2 Designed For?
The Robo C2 is strategically positioned as an accessible and user-friendly desktop 3D printer, making it an ideal choice for a diverse range of users. Its intuitive setup, streamlined operation, and compact form factor make it particularly well-suited for beginners and aspiring hobbyists who are taking their first steps into the exciting world of additive manufacturing. The “plug-and-play” nature minimizes the typical barriers to entry, such as complex assembly or intricate calibration processes, allowing new users to achieve successful prints quickly. Educational institutions also stand to benefit significantly from the Robo C2. Its robust build, quiet operation, and relatively small footprint make it perfect for classroom environments, enabling students to learn about 3D printing technology hands-on without disrupting learning or requiring extensive space. The clear, guided interface and simplified filament loading are advantageous for younger students or those with limited technical experience.
Furthermore, small businesses, designers, and engineers who require rapid prototyping capabilities for functional parts or visual models will find the C2 to be a valuable asset. While its unheated bed limits it primarily to PLA, this material is suitable for a vast array of prototyping needs where high-temperature resistance is not a critical factor. The remote monitoring and control capabilities through the mobile app also cater to professionals who need flexibility in managing their print queues. Lastly, general home users looking to explore creative projects, produce custom household items, or engage in DIY repairs will appreciate the C2’s blend of performance, ease of use, and aesthetic appeal. It’s a machine designed to inspire creativity and deliver reliable results without demanding an expert level of technical knowledge, making 3D printing more approachable for everyone.
6. Pros and Cons of the Robo C2
To provide a balanced perspective, here’s a summary of the key advantages and disadvantages identified during our review of the Robo C2 3D printer:
Pros:
- User-Friendly Experience: The C2 is genuinely a plug-and-play machine. Its quick setup, intuitive touchscreen interface, and semi-automatic calibration make it very accessible for beginners.
- Sleek and Compact Design: Its modern aesthetic with a curved white shell and compact dimensions ensure it fits well into any environment, from a desktop to a classroom.
- Remarkably Quiet Operation: The printer runs very quietly, making it suitable for home, office, or educational settings where noise levels are a concern.
- Reliable Print Quality: For its price point and target audience, the Robo C2 delivers consistently clean and detailed prints, especially when properly calibrated and using optimized settings.
- Excellent Connectivity: Integrated WiFi and a comprehensive iOS mobile app for remote control and monitoring significantly enhance the user experience and flexibility.
- End-of-Filament Detector: This useful feature helps prevent failed prints and material waste, pausing the print when filament runs out.
- Internal Storage: The ability to store multiple .gcode files directly on the printer is convenient for frequently printed models.
- Strong Brand Support: Robo 3D has a history of engaging with its community, as evidenced by its successful Kickstarter campaigns and recommended software.
Cons:
- Unheated Print Bed: This is the most significant limitation, restricting the printer primarily to PLA filament. Users cannot easily print with materials like ABS, PETG, or Nylon without significant modifications or compromises.
- Mobile App Limited to iOS: While the iOS app is robust, the lack of an Android version limits accessibility for a large segment of smartphone users.
- Minor Warping Tendencies: Although manageable with proper settings and calibration, some prints, particularly larger ones, may exhibit slight warping due to the unheated bed.
- Small Build Volume: The print volume of 127 x 127 x 152.4mm is adequate for many small projects but might be restrictive for users needing to print larger objects in one piece.
- No Onboard Camera (C2 Model): Unlike its larger R2 counterpart, the C2 does not feature an integrated camera for live print monitoring directly through the app, which would be a valuable addition.
7. Conclusion: A Strong Contender in the Entry-Level 3D Printer Market
The Robo C2 3D printer firmly establishes itself as a strong contender within the competitive entry-level and compact desktop 3D printer market. From its successful Kickstarter origins in 2016, Robo 3D set out to create an accessible, user-friendly, and capable machine, and based on our comprehensive review, they have largely succeeded. The C2 impresses with its striking modern design, intuitive touchscreen interface, and a streamlined setup process that makes it genuinely “plug-and-play.” Its commitment to a hassle-free user experience is evident in features like semi-automatic Z-axis calibration, easy filament loading with an end-of-filament detector, and robust WiFi connectivity complemented by a feature-rich iOS mobile application for remote management.
While the absence of a heated print bed restricts its material compatibility primarily to PLA, the C2 still delivers reliable and clean print quality for a vast array of common applications. Any minor issues, such as slight warping on larger prints, can typically be addressed with careful calibration and optimized slicing settings. Moreover, its exceptionally quiet operation is a significant advantage, allowing the printer to seamlessly integrate into diverse environments without being a source of disturbance. This makes it an excellent choice for educational settings, creative hobbyists, small businesses engaged in rapid prototyping, or anyone looking to embark on their 3D printing journey with minimal fuss.
Ultimately, the Robo C2 strikes an admirable balance between affordability, ease of use, and respectable performance. It’s a well-engineered machine that caters specifically to those who value simplicity and convenience without wanting to compromise on the potential for quality prints. For users primarily interested in printing with PLA and seeking a reliable, aesthetically pleasing, and remarkably quiet desktop 3D printer, the Robo C2 represents a compelling and valuable investment that will undoubtedly foster creativity and productivity.
What are your thoughts on the impact of desktop 3D printing, or perhaps metal printing, on the future of manufacturing? Let us know in a comment below or join the conversation on our Facebook and Twitter pages! Don’t forget to sign up for our free weekly Newsletter here to get the latest 3D printing news delivered straight to your inbox!