
Mastering 3D Printing Resolution: A Comprehensive Guide to Achieving Superior Detail and Quality
In the dynamic world of 3D printing, the term “resolution” is fundamental to understanding the capabilities of a printer and the quality of its output. While broadly referring to the degree of detail and precision a printer can achieve, more specifically, resolution in 3D printing is defined by the minimum feature size attainable along its three primary axes: X, Y, and Z. The XY plane represents the horizontal dimensions, dictating the detail visible across the surface of each layer, while the Z-axis, which is vertical, corresponds to the layer height. Therefore, a complete understanding of 3D printing resolution necessitates considering two distinct numbers: the measurements defining the XY plane’s detail and the measurement for the Z-axis’s layer height.
Often, our intuitive grasp of resolution comes from experiences with digital images on screens, where a higher pixel density translates to a sharper image. In the realm of 3D printing, the concept is analogous: if a pixel is the smallest element of a 2D image, a ‘voxel’ is its three-dimensional counterpart. A voxel represents a single, cubic unit in a 3D space, and just as smaller pixels mean higher resolution on a screen, smaller voxels allow a 3D printer to create more intricate and refined features.
The Crucial Role of Resolution in 3D Printing
Resolution is paramount because it directly determines the level of detail achievable in the final printed product. This, in turn, profoundly influences various aspects, including the aesthetics, functionality, and overall surface quality of a print. A higher resolution generally leads to smoother surfaces, sharper edges, and the ability to reproduce incredibly fine features, making it critical for applications where visual fidelity or tight tolerances are required. For instance, in industries like jewelry, medical prosthetics, or highly detailed prototypes, superior resolution is non-negotiable. It allows for the creation of intricate geometries and textures that would be impossible with lower-resolution settings, enhancing both the visual appeal and potential performance of the printed object.
However, it’s vital not to confuse resolution with other important concepts like dimensional accuracy and tolerance, as these terms, though related to quality, describe different aspects of a 3D printer’s performance. Dimensional accuracy refers to a printer’s ability to consistently produce parts with dimensions that precisely match the desired measurements from the original digital design. For example, if you design a part to be exactly 100mm long, an accurate printer will produce it at 100mm, not 99.5mm or 100.5mm. Tolerance, on the other hand, refers to the permissible deviation in the dimensions of a printed object compared to its original design specifications. This means that a part might be considered acceptable if its length falls within a specified range, say 100mm +/- 0.1mm. While high resolution contributes to achieving good accuracy and tolerance by enabling finer detail, it doesn’t guarantee them on its own. A printer can have high resolution but still lack accuracy if it’s poorly calibrated or subject to thermal warping.
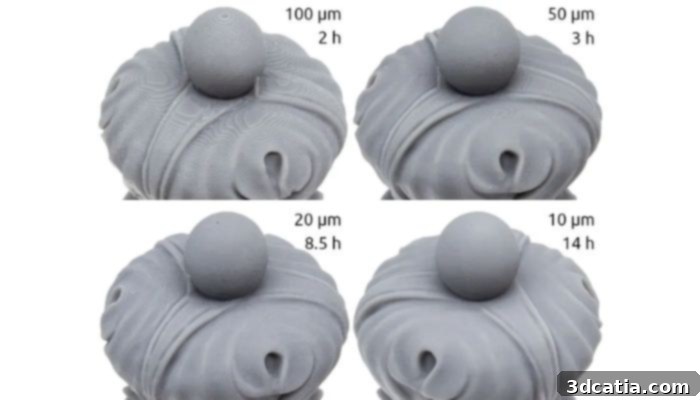
An object printed with SLA with four different layer heights (Image credit: Ameralabs)
Understanding XY Plane Resolution
When evaluating a high-resolution 3D printer, you should focus on its performance across all three axes: X, Y, and Z. Generally, lower numerical values for resolution measurements indicate smaller, more defined details. It’s crucial to remember that what constitutes “high resolution” is often relative to the specific 3D printing technology being employed. Different technologies achieve resolution through distinct mechanisms, leading to varying benchmarks for what is considered excellent. In this article, we will primarily discuss resolution in the context of Fused Deposition Modeling (FDM) and Vat Photopolymerization, which encompasses technologies like Stereolithography (SLA), Digital Light Processing (DLP), and Masked Stereolithography (MSLA, also known as LCD 3D printing).
The XY resolution dictates the finest detail a printer can create horizontally within a single layer. For FDM printers, this is heavily influenced by the nozzle diameter and the precision of the printer’s stepper motors. A smaller nozzle allows for thinner extrusion lines and finer details, much like using a fine-tipped pen instead of a broad marker. However, this often comes at the cost of print speed. In contrast, for vat photopolymerization technologies, XY resolution is determined by the size of the light source’s curing point (e.g., laser spot for SLA) or the pixel size of the projection system (for DLP and MSLA). These methods can often achieve significantly finer XY resolution than FDM.
Factors Affecting Resolution Across Different 3D Printing Technologies
FDM (Fused Deposition Modeling) Resolution
In FDM printers, two primary mechanical factors significantly influence resolution: nozzle size and the smallest possible lateral movement the printer can execute. The nozzle’s diameter is crucial; a smaller diameter allows the printer to deposit finer lines, resulting in more precise details in both width and height. This means sharper corners, more intricate textures, and the ability to reproduce smaller features. However, employing a very small nozzle can considerably slow down the printing process, as more passes are required to fill an area. Conversely, larger nozzles offer less precision but are ideal for printing larger objects that do not demand intricate detail, providing faster print times and stronger parts due to thicker extrusion lines. Beyond the nozzle, the mechanical precision of the stepper motors and belts that control the print head’s movement in the X and Y axes also plays a role, defining the absolute minimum step size or micro-stepping capability. High-quality components and rigid frames contribute to repeatable and accurate movements, thus improving resolution.
Vat Photopolymerization Resolution
The principle of how the light source dictates resolution is similar across all vat photopolymerization technologies, though the implementation varies:
For Stereolithography (SLA) 3D printers, which use a focused laser to cure resin, resolution is determined by the diameter of the laser beam. Just like a smaller FDM nozzle, a smaller laser spot allows for incredibly fine details and smoother surfaces. These laser points can be significantly smaller than an FDM nozzle diameter, often resulting in substantially more precise and higher-resolution prints compared to FDM, capable of capturing minute features and intricate geometries. The precision of the galvanometers that direct the laser beam also contributes to the accuracy of where these small points are placed.
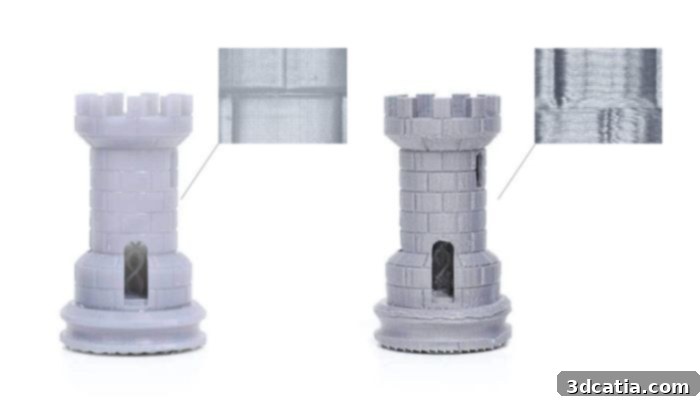
Two chess pieces with 0.1mm layer thickness, the right one printed with FDM and the left with SLA (Image credit: Formlabs)
For Masked Stereolithography (MSLA), often referred to as LCD 3D printing, the resolution along the XY plane is directly dependent on the native resolution of the LCD screen and its pixel density. Each pixel on the LCD screen acts as a tiny shutter, controlling where UV light from an array below is allowed to pass through and cure the resin. The physical size of these individual pixels defines the smallest feature that can be reproduced horizontally. A higher pixel count (e.g., 4K vs. 2K) on the same screen size means smaller pixels and thus higher XY resolution. Some MSLA printers also employ anti-aliasing techniques to smooth jagged edges that might arise from the square pixels, creating a perception of even finer detail.
In Digital Light Processing (DLP), which uses a projector to cure an entire layer of resin at once, the resolution is primarily determined by the size of the individually controlled microscopic mirrors within the Digital Micromirror Device (DMD) chip. Each mirror projects a pixel of light, and the overall resolution is dependent on the projector’s native resolution and how that image is scaled to the print area. A smaller projected pixel size results in higher detail. Like MSLA, the fixed nature of these pixels means that resolution is often uniform across the build plate but can be influenced by the projector’s distance and lens quality.
Understanding Z-Axis Resolution: The Impact of Layer Height
Another critical determining factor for both FDM and resin-based processes is layer height, which corresponds to the Z-axis resolution. Layer height can be precisely controlled through print settings and is fundamentally limited by the printer’s capabilities. It refers to the thickness of each individual slice of material that the printer lays down to build the object. A shorter layer height means that the printer builds the object with more, thinner layers. This generally results in a much smoother surface finish, as the stair-stepping effect between layers becomes less pronounced, almost imperceptible. This is crucial for aesthetic parts or those requiring smooth contact surfaces.
Conversely, a larger layer height means fewer, thicker layers, which leads to more visible layer lines on the printed object. While this might be undesirable for aesthetic prints, it significantly reduces print time and can be perfectly acceptable for functional prototypes or parts where speed and material efficiency are prioritized over fine visual detail. For context, typical desktop FDM printers can often achieve layer heights ranging from 100 microns (0.1 mm) down to 50 microns (0.05 mm), with some high-end machines going even lower. By contrast, vat photopolymerization solutions like SLA, DLP, and MSLA can routinely achieve extremely fine layer heights, often around 30 to 50 microns, and some specialized systems can even go as low as 10-25 microns, allowing for microscopic details and incredibly smooth surfaces that virtually eliminate visible layer lines.
Optimizing Your 3D Print Settings for Desired Resolution
The Trade-off Between Resolution and Print Time
It might seem counterintuitive to opt for anything less than the highest possible resolution, but in practice, maximizing resolution is not always the optimal choice. While high resolution delivers superior detail and surface quality, it can significantly increase print time. For example, simply halving your layer height will effectively double your print time, as the printer has to lay down twice as many layers. This extended print duration reduces overall efficiency and also increases the potential for errors or print failures to occur due to factors like material inconsistencies, environmental changes, or mechanical issues over a longer period. Therefore, it’s crucial to carefully consider whether maximum resolution is truly necessary for your specific application.
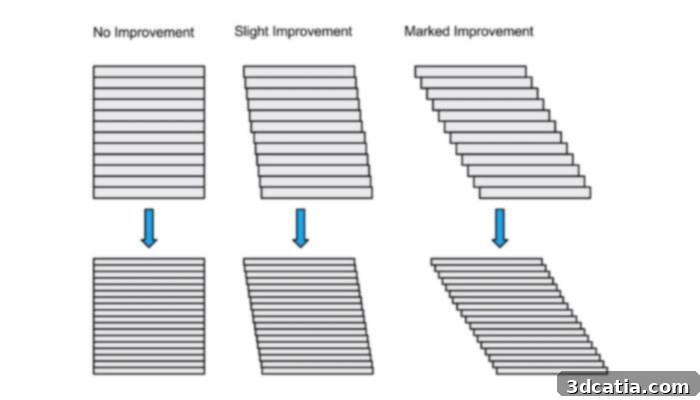
(Image credit: Formlabs)
The graphic above vividly illustrates the impact of layer height on print quality and the visible layer lines. If your 3D model consists primarily of vertical and horizontal edges with mostly 90-degree angles, similar to the object on the left, using extremely thin layers might not provide a noticeable improvement in visual quality or functionality. In such cases, the added print time and potential for errors often outweigh the marginal benefits. Alternatively, designs featuring intricate details, smoothly curved edges, small embossed text or logos, and complex organic forms can greatly benefit from high-resolution settings. For these types of models, thinner layers and finer XY resolution are essential to accurately capture the subtle geometries and smooth transitions, producing a much more refined and aesthetically pleasing final product.
Leveraging Variable Layer Height
To strike a balance between speed and quality, many modern slicer software packages, particularly for FDM printing, offer a feature called variable layer height. This intelligent setting allows you to optimize print time and resolution by applying different layer heights to different sections of a single print. For instance, areas of the model with flat, less detailed surfaces can be printed with thicker, faster layers, while sections containing fine details, gentle curves, or critical aesthetic features can be printed with much thinner layers. This technique ensures that high resolution is prioritized only where it’s truly beneficial, saving significant print time without sacrificing overall quality in critical areas. Variable layer height can often be configured either manually by the user, defining specific zones, or automatically by the slicer based on an analysis of the model’s geometry.
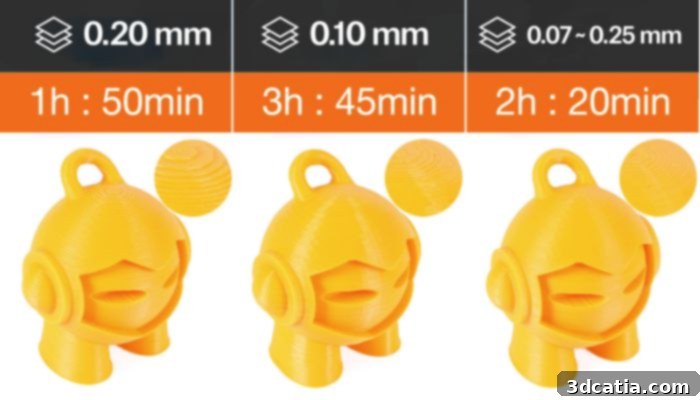
The left uses larger layers and achieves a faster print time, and the center uses smaller layers, resulting in a longer time. The third uses variable layer height, prioritizing smaller layers only where necessary. (Image credit: Prusa)
Practical Tips for Improving 3D Print Resolution
If you are looking to improve the resolution of your 3D prints, experimenting with the parameters discussed in this article is key. Here are some practical tips:
- Calibrate Your Printer Regularly: For FDM, ensure your extrusion is perfectly calibrated. For resin printers, make sure your light source is clean and working optimally.
- Choose the Right Nozzle/Light Source: Select a smaller nozzle for FDM or ensure your resin printer’s light source (laser, LCD, DLP) is capable of fine detail if resolution is paramount.
- Optimize Layer Height: As discussed, experiment with different layer heights. Start with a common setting (e.g., 0.2mm for FDM, 0.05mm for resin) and adjust up or down based on the model’s requirements and your desired balance between speed and quality.
- Consider Print Speed: While not a direct resolution setting, printing too fast can negatively impact detail and surface finish, especially with FDM. Slowing down can allow the printer to lay down material more accurately.
- Material Selection: Some materials are better suited for high-detail printing than others. For FDM, consider materials that flow smoothly and cool consistently. For resin, high-detail resins are formulated to capture intricate features.
- Slicer Software Settings: Explore advanced settings in your slicer, such as anti-aliasing (for resin), variable layer height, and print orientation (which can sometimes hide layer lines).
- Environmental Control: For resin printers, maintaining a consistent temperature is crucial for consistent curing and overall print quality.
Conclusion: Finding Your Ideal Resolution
In general, smaller layers indeed lead to higher resolution – a principle that holds true across virtually all 3D printing technologies. However, the ultimate goal is not always to achieve the highest possible resolution, but rather to find the optimal parameters that best suit your specific printing needs, balancing detail, print time, material usage, and functional requirements. Don’t be afraid to experiment with different settings, iterate on your designs, and learn from your results. Understanding the interplay between XY resolution, Z-axis layer height, and your chosen 3D printing technology empowers you to unlock the full potential of your printer, producing parts that meet both your aesthetic and functional demands.
How would you find the optimal resolution for 3D printing? Let us know in a comment below or on our LinkedIn, Facebook, and Twitter pages! Don’t forget to sign up for our free weekly Newsletter here, the latest 3D printing news straight to your inbox! You can also find all our videos on our YouTube channel.
*Cover Photo Credit: Arthur on Thrinter