
Mastering 3D Printing Infill: A Comprehensive Guide to Density, Patterns, and Optimal Settings
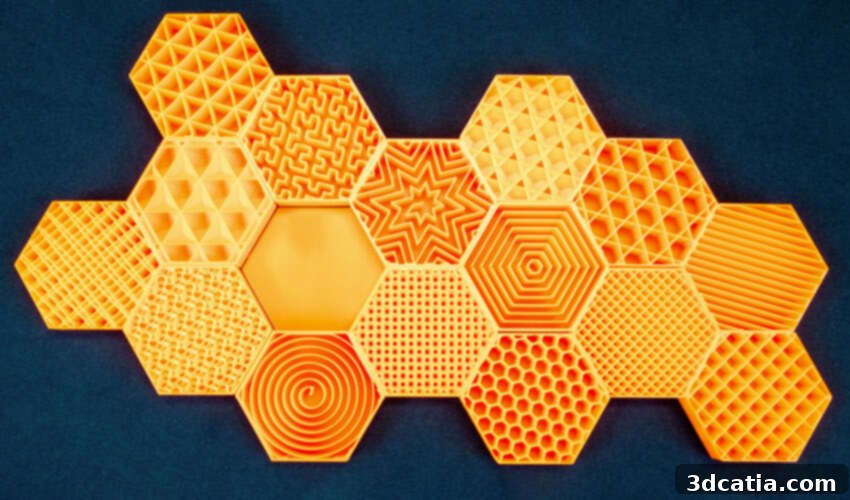
In the world of additive manufacturing, infill plays a crucial role, granting unparalleled control over the internal structure of 3D printed parts. Unlike traditional manufacturing techniques such as injection molding or subtractive methods, 3D printing empowers users to meticulously design and implement intricate infill patterns with adjustable densities. Essentially, infill refers to the internal framework of a 3D printed object, providing indispensable support, enhancing structural integrity, and conferring rigidity. Beyond mere strength, infill profoundly influences a part’s weight, material consumption, and overall physical characteristics. The process of generating this internal architecture is handled by a slicer program, which meticulously translates a 3D model into precise instructions that guide the 3D printer.
While the significance of infill in 3D printing is undeniable, mastering its intricacies can present several challenges, especially for beginners. These hurdles often involve understanding the vast array of available patterns, selecting the most appropriate infill density for a given application, managing complex overhangs effectively, minimizing common printing imperfections, and optimizing various print settings for desired outcomes. Furthermore, gaining practical experience through trial and error is often key to unlocking the full potential of infill customization. By delving into these crucial aspects, enthusiasts and professionals alike can develop the necessary skills to overcome these challenges and consistently achieve optimal results with their 3D prints. This comprehensive article aims to equip you with essential foundational knowledge, guiding you through the complexities of infill and empowering you to produce successful and high-quality 3D printed objects.
Infill Density – What is it and Why Does it Matter?
Infill density quantifies the “fullness” of a printed part’s interior and is typically expressed as a percentage, ranging from 0% (completely hollow) to 100% (completely solid). This setting is a critical determinant of a print’s mechanical properties and resource efficiency. A lower density results in a more hollow part, leading to reduced material consumption, faster print times, and a lighter final object. However, this comes at the potential cost of decreased strength and durability. Conversely, a higher infill density creates a more solid interior, significantly increasing the part’s weight, strength, and resilience. This trade-off between strength, weight, material usage, and print duration is paramount when deciding on the appropriate infill density for any project.
The optimal choice of infill density is entirely dependent on the specific requirements and intended application of the 3D print. For standard prints that do not demand exceptional strength or resistance to significant loads, an infill density ranging from 15% to 50% is generally recommended. This range offers a practical balance between reasonable print time, efficient material consumption, and sufficient structural integrity for most general-purpose items. For functional parts that are expected to withstand considerable stress, bear loads, or require enhanced durability, a higher infill density exceeding 50% is advisable. In extreme cases, a 100% infill density can be used to achieve maximum strength, effectively making the part solid. It is important to remember, however, that higher densities will invariably lead to increased print times and substantially greater material usage, making them less suitable for rapid prototyping or cost-sensitive projects.
In specific applications, such as printing decorative figurines, display models, or artistic pieces where structural strength is not a primary concern, an infill density of 0% to 15% is often sufficient. This low-density range allows for significantly faster prints and dramatically reduces material consumption, though it sacrifices almost all inherent strength. When working with flexible materials like TPU (Thermoplastic Polyurethane), any infill density can technically be used. However, it’s crucial to understand that higher infill densities will directly result in a less flexible final product. For maximizing the characteristic flexibility of such materials, a very low infill density is typically preferred.
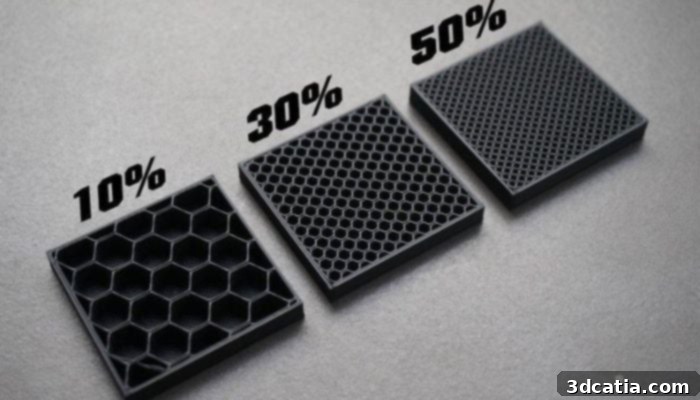
Infills of varying densities (photo credit: Triplaxis)
Exploring Infill Patterns and Their Applications for 3D Printing
Beyond density, the chosen infill pattern profoundly influences the final properties of the 3D printed part. Modern slicer programs offer a diverse library of patterns, ranging from simple, utilitarian lines to complex, geometrically optimized shapes. Each pattern possesses unique characteristics that dictate its suitability for specific applications, affecting factors such as overall strength, print time, weight-bearing capacity, and material flexibility. Understanding these distinctions is key to making informed decisions for successful prints.
Lines
The Lines pattern generates parallel lines within the interior of the print, typically oriented in a single direction (e.g., along the X-axis) and alternating layer by layer. This pattern provides strength primarily in two dimensions, perpendicular to the printed lines. It is celebrated for its efficiency, leading to quick print times and minimal material consumption, while keeping the overall part weight relatively light. It is ideal for rapid prototyping or non-structural parts where speed and material savings are prioritized over multi-directional strength.
Honeycomb
The Honeycomb pattern creates a visually appealing and structurally efficient hexagonal lattice, mimicking nature’s own robust designs. This pattern offers moderate strength and a good balance between print speed and material conservation. Honeycomb infill is particularly preferred when significant weight reduction is a primary concern, without entirely sacrificing structural integrity. Its geometric efficiency makes it well-suited for applications in aerospace, drones, or other lightweight components where a high strength-to-weight ratio is crucial.
Grid
Similar in concept to the Lines pattern, the Grid pattern consists of two-dimensional lines printed in perpendicular directions on every layer, forming a robust grid structure. This provides balanced two-dimensional strength across both the X and Y planes. The Grid pattern offers an excellent compromise among strength, material usage, and print time, making it one of the most versatile and commonly utilized infill patterns. It is a reliable choice for general-purpose prints requiring a moderate and consistent level of structural support.
Triangles
The Triangles pattern utilizes overlapping triangular lines, forming a network of interconnected triangles throughout the part. Triangles are inherently strong geometric shapes, and this pattern leverages that strength to provide enhanced two-dimensional resistance within the XY plane. It is a suitable choice for parts that demand good lateral strength and rigidity, often used for components subjected to bending or shearing forces in those specific directions.
Tri-hexagon
The Tri-hexagon pattern is a more advanced variant that combines lines running in three distinct directions within the XY plane. This creates a complex internal structure featuring both hexagonal and triangular formations. The combination of these shapes results in superior two-dimensional strength compared to simpler patterns, making it highly effective for strong prints where durability and resistance to multi-directional forces in the horizontal plane are critical.
Cubic
The Cubic pattern is renowned for its exceptional three-dimensional strength. It consists of stacked cubes that are typically tilted by 45 degrees around the X- and Y-axes, which often causes them to appear as a network of triangles when viewed from specific angles. This intricate geometry distributes forces effectively in all directions, making it an excellent choice for functional parts that need to withstand compressive, tensile, and torsional stresses from multiple angles.
Octet
The Octet pattern shares similarities with the Cubic pattern in its goal of achieving three-dimensional strength but materializes as a scaffold of interconnected squares rather than triangles within its internal structure. This pattern provides robust support in all spatial dimensions and also offers a unique, visually appealing internal structure if transparency is a factor. It is highly effective for parts requiring high strength in complex loading scenarios.
Gyroid
The Gyroid pattern is a visually distinctive and highly advanced infill choice, characterized by its continuously smooth, irregular concave curvatures that intersect in a complex, non-directional manner. This unique mathematical structure offers an exceptional balance between strength, material usage, and print time. The Gyroid infill is particularly advantageous when structural integrity and enhanced load-bearing capabilities are paramount, as its isotropic nature helps distribute stress evenly, significantly reducing the risk of delamination and improving impact resistance. It’s often considered one of the most effective patterns for robust functional parts.
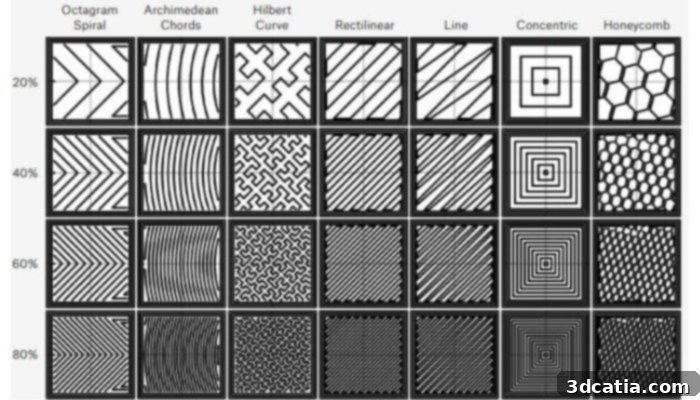
Photo credits: B&C Digital Fabrication Solution
When making the critical decision on the appropriate infill pattern, it is essential to consider the unique advantages each pattern offers in terms of overall strength, desired weight, required print time, flexibility, and even buoyancy for specific applications. For common, everyday prints that need a good balance of properties, patterns like Grid or Triangles are often excellent starting points. Functional parts designed for demanding use cases can significantly benefit from advanced patterns such as Cubic, Gyroid, or Octet, which provide superior structural integrity and multi-directional strength. For objects demanding the absolute highest strength or exceptional load-bearing capabilities, Gyroid or Concentric patterns (though not detailed above, Concentric follows the perimeter shape inward) are ideal, as they offer enhanced structural robustness. Conversely, when the primary objective is weight reduction and efficient material usage, the Honeycomb infill excels. Line patterns are frequently chosen for decorative figurines and model prints due to their speed, while Concentric patterns truly shine when flexibility is key, delivering a strong yet pliable structure with minimal material consumption. For general-purpose prints that seek a harmonious blend of strength, printing speed, and economical material usage, the versatile Grid infill pattern consistently emerges as a highly fitting and reliable choice.
UltiMaker’s Lightning Infill: An Intuitive and Efficient Approach
UltiMaker Cura, a widely used slicer program, introduced a revolutionary infill option known as Lightning Infill, marking it as one of the first truly intelligent infill solutions natively integrated into a slicer and made available as an open-source option. Lightning Infill presents a fundamentally unique approach to supporting 3D prints by dynamically generating internal supports based on the specific geometry and topology of the model. Unlike traditional infill patterns that fill a predetermined volume uniformly, Lightning Infill intelligently creates support structures primarily underneath the “roof” or top layers of the model, leaving much of the interior partially hollow or sparsely supported where not strictly necessary for structural integrity.
While Lightning Infill is not engineered for maximum strength or critical load-bearing applications, its innovative design offers significant advantages in terms of filament efficiency and rapid prototyping. By maintaining a partially hollow structure and only providing reinforcement where critically needed, it dramatically reduces material usage and print time. This makes Lightning Infill an invaluable tool for ornamental prints, visually appealing prototypes, or any scenario where aesthetic finish and quick turnaround are prioritized over robust mechanical properties. In situations where functional or stress-bearing parts are required, other traditional infill patterns remain the recommended choice. However, for scenarios that emphasize reduced material consumption, faster printing, and sufficient support for top surfaces, Lightning Infill proves to be an incredibly valuable and efficient solution.
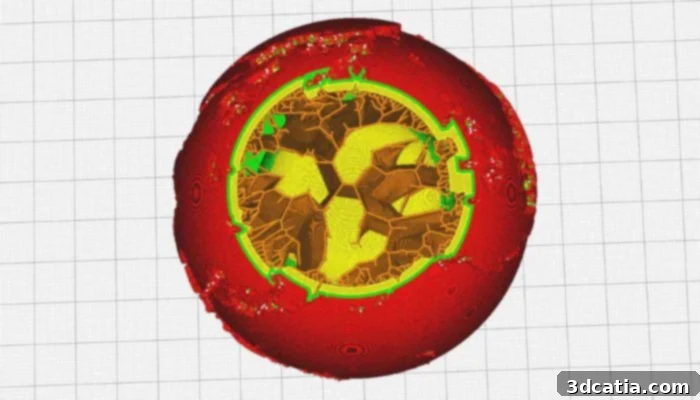
A demonstration of lightning infill (Photo credit: Ultimaker)
Unlocking Strength, Versatility, and Precision in 3D Printing with Optimized Infill
In essence, infill is an indispensable component for creating structurally sound and reliable parts in additive manufacturing. Its significance extends beyond merely improving the physical characteristics of a part; it also provides essential internal support and establishes crucial connectivity between different print areas, especially vital when dealing with complex geometries and intricate shapes. While it is theoretically possible to print simple shapes without any infill (0%) or with a minimal amount, infill is generally a necessity for achieving the desired strength, structural integrity, and proper weight distribution in standard and functional parts. It ensures that the printed object can withstand its intended use and maintain its form over time.
To achieve a uniform and aesthetically pleasing surface finish, free from visible marks or “ghosting” caused by the internal infill structure, several crucial adjustments can be made within your slicer software. The **wall thickness** (also known as perimeter or shell count) is a critical factor; overly thin walls may reveal the underlying infill pattern, particularly in top surface areas or thin sections. Increasing the wall thickness or augmenting the number of top and bottom layers can significantly help mitigate this issue by creating a thicker, more opaque shell. The **infill overlap percentage** determines how much the infill lines connect with the model’s perimeter, directly influencing the wall’s resistance and adhesion. Adjusting this overlap, typically around an optimal value of 10-15%, can effectively reduce visible infill marks by ensuring better integration without excessive bulging. Finally, the **printing order**, specifically enabling an option like “Infill Before Walls,” can often improve the surface quality of tricky overhangs, as the outer walls are printed last, preventing them from dragging. However, be aware that this setting might sometimes leave very subtle marks on the side surfaces of the piece, requiring a careful balance based on the model’s design.
A comprehensive understanding of the intricate relationship between infill density, infill pattern, and other critical printing parameters empowers 3D printing enthusiasts and seasoned professionals alike to fine-tune and optimize their prints for virtually any specific requirement. By meticulously selecting the appropriate infill settings – from choosing the right pattern to dialing in the perfect density and adjusting overlap – you gain the ability to achieve the precise strength, desired weight, robust structure, and other essential physical properties in all your 3D printed creations. This level of customization is what truly elevates 3D printing from a simple fabrication method to a powerful tool for innovation.
What are your thoughts on 3D printing infill and its impact on your projects? Share your experiences and insights in a comment below or connect with us on our LinkedIn, Facebook, and Twitter pages! Don’t forget to sign up for our free weekly Newsletter here to receive the latest 3D printing news directly to your inbox. You can also explore all our informative videos on our YouTube channel for more content.
*Cover photo credit: Prusa