

The Ultimate Guide to Preventing and Fixing 3D Printer Over-Extrusion
Additive manufacturing stands as a cornerstone of modern fabrication, empowering creators with unparalleled design freedom and the ability to produce complex, intricate structures. Among the various 3D printing technologies, Fused Deposition Modeling (FDM), often referred to as fusion layering, continues to dominate in popularity. Its widespread adoption, as highlighted in reports like the latest Hubs Report for 2023, is largely due to its relative ease of use and user-friendly nature, making it accessible to hobbyists and professionals alike. However, even with its simplicity, FDM printing is not immune to common issues that can compromise print quality, leading to aesthetically displeasing or functionally unusable parts. Previously, we’ve explored challenges such as elephant foot, stringing, and warping. Today, our focus shifts to another prevalent problem in FDM 3D printing: over-extrusion.
Over-extrusion occurs when your 3D printer’s extruder mechanism deposits an excessive quantity of filament material onto the print bed or previous layers. This over-supply of plastic material leads to a cascade of undesirable effects. Visibly, it manifests as bulging or swelling at the edges and corners of your printed parts, obscuring fine details and reducing dimensional accuracy. Furthermore, individual layers may appear inconsistent in thickness, resulting in uneven, rough, and aesthetically unappealing surfaces. Beyond cosmetic flaws, unchecked over-extrusion can have severe mechanical consequences, including increased pressure within the hotend, which can eventually lead to persistent nozzle clogging, print failures, and even damage to your printer’s components. Understanding the root causes of over-extrusion is the first step toward achieving pristine 3D prints. In the following sections, we will delve into the primary reasons behind this common issue and equip you with practical, actionable solutions to prevent its recurrence and ensure flawless prints in your future additive manufacturing endeavors.
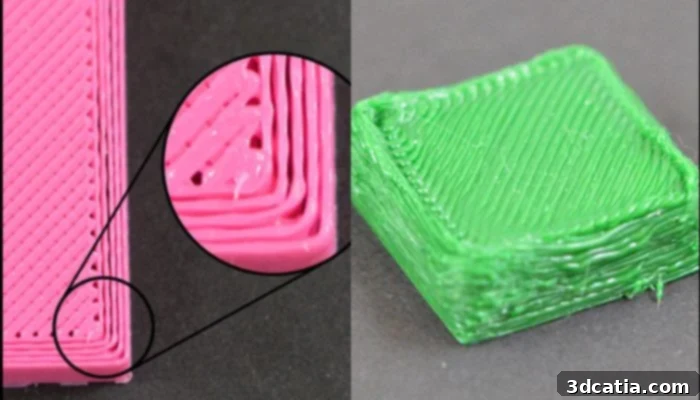
Over-extrusion manifests itself in over-swelling edges and a lack of precision and detail (photo credits: Creality)
Understanding the Causes of Over-Extrusion in 3D Printing
Identifying the precise cause of over-extrusion is crucial for effective troubleshooting. While seemingly simple, this issue can stem from various factors, often a combination of software settings and hardware conditions. Let’s break down the most common culprits:
Excessive Printing Temperature
The most frequent cause of over-extrusion is an overly high printing temperature. When the hotend’s temperature is set too high, the filament melts more rapidly and becomes significantly less viscous. This increased fluidity makes it challenging for the extruder to precisely control the material’s flow rate. The plastic essentially “oozes” out of the nozzle more freely than intended. In such scenarios, the cooling fan, despite its efforts, often struggles to rapidly solidify the overly fluid filament as it exits the nozzle, leading to an uncontrolled and excessive material deposit on the print. The hot filament remains molten for too long, losing its structural integrity and causing the bulging effects.
Incorrect Filament Diameter
Another critical factor contributing to over-extrusion is an inaccurate filament diameter. If the filament being used has a smaller actual diameter than the value configured in your slicer software, the printer will command the extruder to push more material than necessary to achieve the desired volumetric flow. For example, if your slicer expects a 1.75mm filament but the actual filament measures 1.70mm, the printer will extrude an “excess” of material for every millimeter of filament pushed through the nozzle. This cumulative error quickly leads to over-extrusion. Conversely, if the filament is thicker than specified, it can lead to under-extrusion, highlighting the importance of precise diameter calibration.
Improper Slicer Flow Rate (Extrusion Multiplier) Settings
Slicer software plays a pivotal role in dictating how your 3D printer operates. The flow rate, often referred to as the extrusion multiplier or flow percentage, is a critical setting that directly controls the amount of filament extruded. This setting determines the volumetric flow of material per second, calculated based on parameters like printing speed, nozzle size, and layer height. If the flow rate is set too high in your slicer, the software will instruct the extruder to push an excessive amount of filament through the nozzle, irrespective of other factors, resulting in over-extrusion. This is a common adjustment point when fine-tuning a new filament type or troubleshooting print quality issues.
Worn or Damaged Nozzle
While less common than temperature or flow rate issues, a worn or damaged nozzle can also contribute to over-extrusion. Over time, especially when printing with abrasive materials like carbon fiber-filled or wood-filled filaments, the nozzle’s orifice can widen. An enlarged nozzle opening will allow more material to pass through than the slicer expects for the set nozzle diameter, leading to an over-extrusion effect. A partially clogged nozzle can also intermittently cause flow inconsistencies that resemble over-extrusion in certain areas of the print.
Now that you have a clear understanding of the possible causes behind this frustrating 3D printing error, let’s explore the effective strategies and practical solutions available to fix it and prevent its recurrence, ensuring consistently high-quality 3D prints.
Effective Solutions for Over-Extrusion: Software Adjustments
Most over-extrusion issues can be resolved by carefully adjusting your 3D printer’s software settings, primarily within your slicer program. These software-based solutions offer precise control over the extrusion process and are often the first line of defense against excessive material flow.
Reducing Print Temperature to Prevent Over-Extrusion
The simplest and often most effective first step to address over-extrusion is to evaluate and potentially lower your printing temperature. The optimal printing temperature is highly dependent on the specific type and brand of filament you are using. Each material has a recommended temperature range provided by the manufacturer. For example, when working with common materials:
- PLA (Polylactic Acid) typically prints well between 190°C and 220°C.
- ABS (Acrylonitrile Butadiene Styrene) generally requires higher temperatures, ranging from 230°C to 260°C.
- PETG (Polyethylene Terephthalate Glycol) often falls between 210°C and 250°C.
To fine-tune this setting, it’s advisable to perform a temperature tower test, a calibration print designed to identify the ideal temperature for your filament and printer setup. If you suspect over-extrusion due to high temperatures, begin by gradually reducing the print temperature in small increments, typically 5°C at a time. After each adjustment, print a small test piece to observe the changes. It’s crucial not to lower the temperature excessively, as this can lead to the opposite problem: under-extrusion, where insufficient material is deposited, resulting in weak, gappy, or incomplete prints. The goal is to find the lowest temperature that still allows for smooth, consistent extrusion and excellent layer adhesion.
Calibrating Filament Diameter for Precise Extrusion
Another critical step in preventing over-extrusion is accurately calibrating the flow rate based on the exact diameter of your filament. While most filaments available on the market adhere to standard sizes like 1.75 mm, 2.85 mm, or 3 mm, minor manufacturing deviations are common and can significantly impact print quality. It is essential to ensure that the filament size entered into your slicer software precisely matches the actual diameter of the filament you are using. While specifying the manufacturer’s nominal specifications is a good starting point, for optimal accuracy, manual verification is highly recommended.
To do this, use a high-quality digital caliper to measure the filament diameter at multiple points along a fresh section of the spool – ideally five different locations, rotated 90 degrees each time, and averaged. This comprehensive measurement helps account for any slight inconsistencies in the filament’s roundness. For example, a filament labeled as 2.85 mm might actually measure 2.84 mm or 2.86 mm. This seemingly small deviation can cumulatively lead to significant over or under-extrusion over the course of a print. Once you have calculated the average diameter, enter this precise measured value into the filament settings (or machine parameters) section of your slicer software. This adjustment tells the slicer the true volume of plastic being fed, allowing it to calculate the correct amount of filament to push through the nozzle for accurate volumetric extrusion.
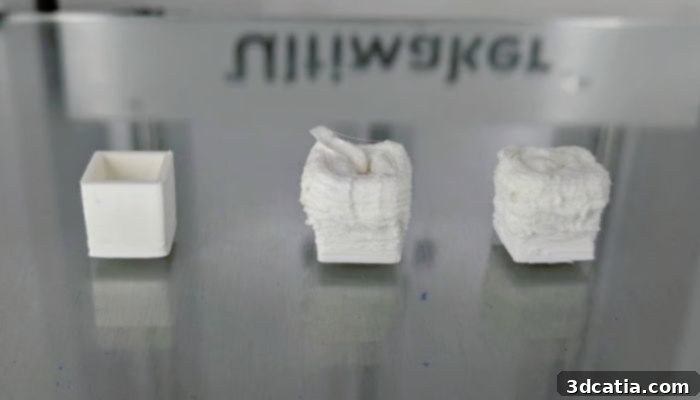
Photo credit: Ultimaker Community
Adjustment of the Extrusion Multiplier (Flow Rate)
The extrusion multiplier, or flow rate setting, offers direct control over the amount of filament extruded during printing. Typically, the default value for the extrusion multiplier is set at 1.0 (or 100%). However, if you are experiencing over-extrusion, adjusting this value downwards is often necessary. A common approach is to gradually reduce this value in small increments, generally 2.5% to 5% at a time, followed by printing a test cube or a small calibration part to evaluate the impact of each adjustment. This iterative process helps you zero in on the perfect flow rate for your specific setup and filament.
For a more precise and data-driven calibration of the extrusion multiplier, the “100mm extrusion test” is highly recommended. Here’s how to perform it:
- **Mark the filament:** First, manually measure and mark a point 120mm from the entry point of your extruder along the filament. Use a fine-tipped marker for accuracy.
- **Extrude filament:** Instruct your 3D printer (via its control panel or host software) to extrude exactly 100mm of filament. Ensure the nozzle is at printing temperature and clear of clogs.
- **Measure remaining filament:** After the extrusion process is complete, measure the remaining length of filament from the extruder entry point to your marked line.
- **Calculate adjustment:** If, for example, you find that 104mm of filament was actually extruded (meaning only 16mm remained from your 120mm mark), this indicates a 4% over-extrusion. To correct this, you would then lower your extrusion multiplier by 4%. The formula for calculating the new flow rate is: (Expected Extruded Length / Actual Extruded Length) * Current Flow Rate. So, (100mm / 104mm) * 1.00 = 0.96 (or 96%).
It’s important to note that the optimal extrusion multiplier can vary not only between different types of filament but also between different colors or brands of the same material. For instance, some popular slicer software, like Simplify3D, often suggests a base extrusion multiplier of around 0.9 (90%) for PLA, while for ABS, it might be closer to 1.0 (100%) due to its different flow characteristics. Always perform this calibration whenever you switch to a new type or brand of filament to ensure consistent and accurate prints.
Effective Solutions for Over-Extrusion: Hardware Maintenance
While software settings address the majority of over-extrusion issues, certain hardware conditions can also contribute to or exacerbate the problem. Regular maintenance and careful inspection of your printer’s physical components are vital for consistent print quality.
Nozzle Care and Replacement
Maintaining a clean, unblocked, and undamaged nozzle is paramount for precise extrusion. The nozzle is the final gateway for the molten filament, and its condition directly impacts the material flow. Regularly inspect your nozzle for any signs of wear, particularly if you frequently print with abrasive materials. Filaments infused with particles like wood, metal, or carbon fiber act like sandpaper on the nozzle’s internal walls, causing the delicate orifice to gradually widen over time. A worn nozzle with an enlarged opening will inevitably extrude more material than the slicer expects for its configured diameter, leading directly to over-extrusion.
If you notice a decrease in print precision, unexplained bulging, or inconsistencies that aren’t resolved by software adjustments, carefully inspect your nozzle. A visual comparison with a new nozzle can often reveal significant wear. When wear is detected, prompt replacement of the nozzle is crucial to restore optimal printing results. Consider investing in hardened steel nozzles if you frequently use abrasive filaments, as they offer significantly better wear resistance than standard brass nozzles. Regular cold pulls or cleaning methods can also help prevent partial clogs that might mimic over-extrusion symptoms or cause intermittent flow issues.
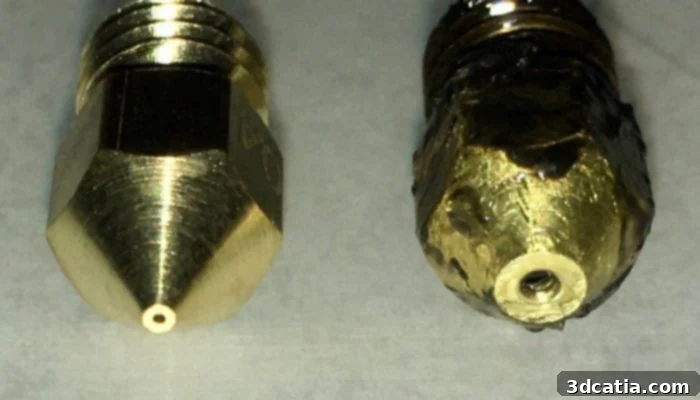
The comparison of the nozzle diameter of a worn nozzle (right) and a new one (left). (photo credit: Stack Exchange)
Checking Extruder Hardware and Bowden Tube
While less directly linked to over-extrusion, issues with other hardware components in the filament path can lead to inconsistent extrusion that might be mistaken for or exacerbate over-extrusion. Ensure your extruder gears are clean and have proper tension. If the gears are slipping or grinding the filament, it can cause inconsistent feeding, sometimes resulting in momentary jams followed by excessive pushing of material once the jam clears. For Bowden-style printers, inspect the Bowden tube for any kinks, damage, or loose connections. A compromised Bowden tube can create friction, leading to uneven filament delivery and flow rate fluctuations. Addressing these underlying mechanical issues can contribute to a more stable and controlled extrusion process.
Conclusion: Achieving Flawless 3D Prints by Conquering Over-Extrusion
Over-extrusion is a common but highly solvable challenge in FDM 3D printing. By understanding its underlying causes—ranging from incorrect temperature settings and inaccurate filament diameter measurements to miscalibrated flow rates and worn hardware—you now possess the knowledge to systematically diagnose and resolve this issue. Implementing a few key strategies will empower you to effectively counteract over-extrusion and dramatically improve the quality of your future 3D prints.
These strategies include: precisely reducing the print temperature to optimize filament viscosity, meticulously calibrating the filament diameter to ensure accurate volumetric extrusion, fine-tuning the extrusion multiplier (flow rate) through methodical testing, and diligently maintaining your nozzle for optimal material delivery. By carefully applying these measures, you can eliminate the unsightly bulging, inconsistent layers, and loss of detail that characterize over-extrusion. Embrace these calibration and maintenance practices as integral parts of your 3D printing workflow, and you will consistently achieve superior printing outcomes, producing functional and aesthetically pleasing parts with confidence and precision.
What are your experiences with over-extrusion? Do you have any additional tips or tricks you’ve found effective? Let us know in a comment below or connect with us on ourLinkedIn,Facebook, andTwitter pages! Don’t forget to sign up for our free weeklyNewsletter here for the latest 3D printing news delivered straight to your inbox! You can also find all our videos on ourYouTube channel.
*All photo credits: AB3D