
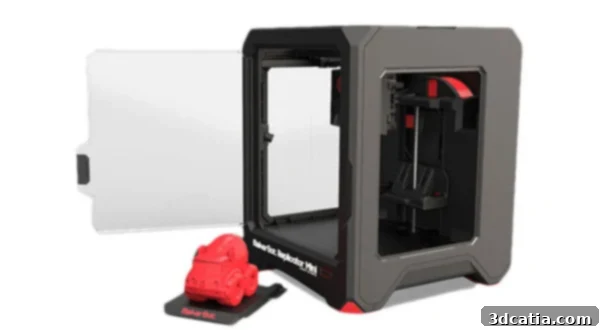
MakerBot Replicator Mini Review: An In-Depth Look at This Entry-Level 3D Printer for Personal Use
In 2013, MakerBot’s CEO made a significant announcement at CES, unveiling a new generation of personal 3D printers designed to bring additive manufacturing to a wider audience. Among these highly anticipated machines was the Replicator Mini, an entry-level model from the renowned American manufacturer, aimed at simplifying the 3D printing experience. Here at 3Dnatives labs, we were eager to put this compact device through its paces to evaluate its performance, user-friendliness, and overall value in the rapidly evolving desktop 3D printing market. We extend our sincere gratitude to the dedicated team at Makershop.fr for graciously lending us this machine for our comprehensive review today.
The MakerBot Replicator Mini was designed to be a gateway into the world of 3D printing, targeting beginners, educators, and hobbyists who sought a reliable and accessible tool without a steep learning curve. Our mission with this test was to determine if it lived up to its promise of ease-of-use and consistent results, making personal 3D fabrication a reality for more individuals. We focused on every aspect, from the initial unboxing to complex print operations, to provide a detailed and objective assessment.
Unboxing the MakerBot Replicator Mini: A Premium First Impression
The unboxing experience of the Replicator Mini immediately set a high standard. From the moment we opened the outer packaging, the meticulous attention to detail reminded us of the refined presentation often associated with premium consumer electronics, such as a new Apple computer. Every component was thoughtfully organized and impeccably protected, hinting at the quality of the product within. The packaging itself was pristine, devoid of any blemishes, which heightened our anticipation for the machine inside.
Upon opening the main Replicator Mini box, we discovered two distinct packages, each playing a crucial role in the setup process. The first, naturally, contained the 3D printer itself, securely nestled and protected for transport. The second package, a smaller but equally vital box, housed all the essential accessories and components required to get started. This included the main power plug, a USB cable for direct computer connection, a transparent filament guide tube, a starter spool of transparent PLA filament, the innovative Smart Extruder, and a flexible printing tray. Additionally, we found several sheets of blue adhesive tape designed to enhance filament adhesion to the print bed, two orange clips specifically for securing the motor straps during shipping, and a comprehensive instruction manual along with the warranty documentation. This well-organized assortment ensured that users had everything they needed to begin their 3D printing journey right out of the box, minimizing confusion and maximizing the excitement of a new device.
The contents inside of the box: a clear and organized presentation.
Effortless Installation for Immediate Printing
One of the core promises of the Replicator Mini is its accessibility, and the installation process certainly delivered on this. Users are unlikely to encounter any significant hurdles, especially when diligently following the exceptionally clear and well-illustrated instructions provided. The first critical step involves installing the Smart Extruder onto the Mini Replicator. This component attaches with remarkable ease thanks to its intuitive magnetic fasteners, requiring no tools or complex alignment. Once in place, the extruder automatically calibrates itself with the printing tray, ensuring optimal print bed leveling and precise first-layer adhesion. An intelligent sensor within the extruder also detects if filament is missing, prompting the user for a new spool, thereby preventing failed prints due to material shortages. A notable advantage of this design is the Smart Extruder’s removable nature, a brilliant feature that significantly simplifies maintenance and allows for easy replacement if needed, extending the lifespan and reliability of the machine.
The different accessories included in the box, making setup a breeze.
The second step in the installation process focuses on preparing the filament. Users need to install the filament reel into the designated space located behind the printing plate and then clip the conductor tube securely into position. It’s important to note that, in the absence of a heated print bed, the Replicator Mini is exclusively designed to accept PLA plastic filaments. While MakerBot introduced a new, proprietary coil format for their filaments, savvy users can still utilize non-proprietary filaments, offering greater flexibility and potentially reducing material costs. This is typically achieved by placing an external spool of generic PLA near the machine and carefully winding a portion of that filament onto a blank MakerBot coil to fit the machine’s internal mechanism. Once the filament is loaded and secured, the final steps are straightforward: connect the USB cable to the side panel of the printer, plug in the main power cable, and then simply switch on your Replicator Mini. The entire installation process, from unboxing to ready-to-print, is remarkably quick and intuitive, making it ideal for those new to 3D printing.
A smart and removable extruder, simplifying maintenance and ensuring reliability.
The print tray, offering a build volume of 10 x 10 x 12.5 cm for diverse projects.
A zoom in on the extruder, with the clear location for the filament coil, designed for ease of loading.
Mastering Your Prints with MakerBot Desktop Software
Before initiating your first print, the indispensable step is to install the MakerBot Desktop software. This proprietary slicing and control application, a direct evolution and replacement for the earlier MakerWare software, can be easily downloaded from MakerBot’s official website. The software acts as the brain behind the printer, translating your 3D models into printable instructions and offering a comprehensive suite of tools for managing your 3D printing workflow.
The MakerBot Desktop boasts a streamlined and user-friendly interface, designed to be intuitive for both newcomers and experienced users. Its functionality is thoughtfully organized into five distinct sections, ensuring that all aspects of the 3D printing process are easily accessible:
- Explore: This section serves as a direct gateway to Thingiverse, the world’s largest online community and repository for free 3D printable models. Users can browse, download, and immediately prepare models from a vast collection, making it incredibly easy to find inspiration and start printing diverse objects without needing design software skills.
- Library: Acting as your personal digital archive, the Library stores all your downloaded or purchased 3D files, whether from Thingiverse, the MakerBot Store, or other sources. It provides a centralized location to manage your collection of models, making it simple to revisit and reprint favorite designs.
- Prepare: This is the operational core of the software, where you stage, manipulate, and ultimately initiate your prints. Here, users can import 3D models, adjust their size and orientation, and configure all the crucial printing parameters before sending the job to the printer.
- Store: As its name suggests, the Store section grants access to MakerBot’s curated selection of premium 3D models and designs, often available for purchase. This provides an avenue for users to acquire professionally designed content and unique printables directly from MakerBot.
- Learn: Recognizing the learning curve for new users, the “Learn” section provides valuable resources, including video tutorials and tips. These guides are designed to help users get acquainted with their MakerBot machine and the software, ensuring a smooth onboarding experience and ongoing support for various printing tasks.
Within the “Prepare” section, the interface retains a familiar style, reminiscent of the older MakerWare software, but with enhanced functionality. This is where you add and position your 3D file on the virtual build plate. The window also features convenient shortcuts to a variety of essential print settings, allowing for fine-tuned control over the printing process. These settings include:
- Print Mode: Offering options like ‘low’, ‘standard’, and ‘high’, this allows users to balance print speed with desired detail and quality, catering to different project requirements.
- Add Media or Raft: This controls the generation of support structures for overhangs and bridges, and rafts for improved bed adhesion, crucial for successful prints of complex geometries.
- Fill Level: Also known as infill density, this setting determines the amount of material used to fill the interior of an object, impacting its strength, weight, and print time.
- Layer Thickness: With a minimum of 200 microns (0.2mm), this setting directly influences the vertical resolution and surface smoothness of the printed object. Smaller layer heights result in finer details but longer print times.
- Number of Walls: This defines the number of perimeters or outer shells of the object, which significantly affects its structural integrity and visual finish.
- Movement Speed for the Extruder: Controls how quickly the extruder moves when not laying down filament, impacting travel time and potential stringing.
- Printing Speed: Determines the rate at which filament is extruded, directly affecting print duration and, to some extent, print quality.
This comprehensive control over print parameters empowers users to optimize their prints for various applications.
A significant enhancement, thanks to software updates available at the time of our test, is the MakerBot Desktop’s ability to connect to your Replicator Mini via Wi-Fi. This eliminates the need for a constant USB connection, offering unparalleled convenience. To enable this, users initially connect the Replicator Mini via USB, then navigate to the ‘Devices/Connect to a new device’ menu to select and configure their machine for wireless operation. Beyond the obvious advantage of being able to remotely manage your MakerBot, this Wi-Fi connection unlocks another powerful feature: the ability to retrieve live video feeds from the embedded camera within the printer. This invaluable capability allows users to monitor their prints remotely, checking on progress, identifying potential issues, and ensuring that everything is running smoothly without needing to be physically present next to the machine. This level of remote control and monitoring significantly enhances the user experience, particularly for longer prints.
First Prints: Performance and User Experience
With the software installed and the printer set up, it was time for the moment of truth: the first print. After selecting our desired 3D file within the MakerBot Desktop software, we simply clicked the “Print” button. For our initial test, we opted for the default print settings to assess the machine’s out-of-the-box performance. The process began with a short loading time as the software prepared the file, followed by the automatic calibration of the print bed and the heating of the Smart Extruder. Within moments, the first layer of plastic was precisely deposited onto the printing tray, signaling a successful start. Victory!
However, during this initial print, a noticeable characteristic of the Replicator Mini quickly became apparent: its operating noise. Having tested numerous 3D printers, we can confirm that the buzzing and whirring of the motors and extruder during operation are quite distinct, making it noticeably noisy if you plan on remaining in the same room while printing. While not excessively loud, it is certainly not a silent machine. Our advice for users who prefer a quiet working environment or plan to print frequently would be to consider placing the printer in a separate room, a workshop, or a dedicated space where the noise would be less intrusive. This consideration is particularly relevant for home users or educational settings where quiet operation might be desired.
Despite the acoustic feedback, the Replicator Mini performed admirably. Approximately 25 minutes later, our first test model was successfully printed, showcasing excellent layer adhesion and overall structural integrity. The object detached from the print bed with remarkable ease, leaving behind a clean surface and demonstrating the effectiveness of the blue adhesive sheets provided. There were no worries about plastic adhesion issues, a common concern with some 3D printers, making the post-processing step incredibly straightforward and satisfying.
As part of our standard testing protocol at the 3Dnatives lab, we proceeded with a more challenging benchmark using a 3D model specifically designed to push the machine’s capabilities. This model incorporates intricate features such as significant offsets, steep angles, and extremely thin walls – elements that often prove problematic for many desktop FDM (Fused Deposition Modeling) 3D printers. Despite these complex geometries, the Replicator Mini once again demonstrated its reliability and precision. It navigated these demanding features without issue, producing a clean and accurate print. This test confirmed that the Mini is not just capable of simple objects, but can handle more elaborate designs, further solidifying its standing as a competent entry-level machine for various prototyping and creative tasks.
The overall print quality for PLA objects was consistently good. Layers were well-adhered, and the surface finish, while not perfectly smooth at the standard layer height, was more than acceptable for an entry-level machine. We observed minimal stringing or defects, indicating that the Smart Extruder and software profiles are well-tuned for PLA material. The machine proved to be a reliable workhorse for consistent, repeatable PLA prints, which is a critical factor for any desktop 3D printer.
Key Strengths and Considerations for the MakerBot Replicator Mini
After thoroughly testing the MakerBot Replicator Mini, we can highlight several key strengths that make it an attractive option for its target audience. Its primary strength lies in its exceptional ease of use, from the intuitive unpacking experience to the simplified installation process. The Smart Extruder, with its magnetic attachment, automatic calibration, and filament detection, is a standout feature that significantly reduces common frustrations associated with 3D printing. The MakerBot Desktop software, with its clean interface and integrated access to Thingiverse and learning resources, further enhances the user experience, making 3D printing accessible even for absolute beginners. The addition of Wi-Fi connectivity and the embedded camera for remote monitoring are modern conveniences that greatly improve workflow and provide peace of mind during longer prints. Furthermore, the reliable print quality, particularly with PLA, and consistent performance on both simple and more complex models, are commendable for a machine in this category.
However, there are also some considerations for potential buyers. The most notable is the printer’s operational noise level, which might be a deterrent for those planning to use it in quiet environments such as bedrooms or open-plan offices. The limitation to PLA filament due to the absence of a heated print bed restricts material versatility, meaning users cannot experiment with materials like ABS or PETG without external modifications. While a workaround for non-proprietary filament exists, MakerBot’s push towards its own coil format could be seen as a limitation on user choice and potentially cost. Finally, the build volume of 10 x 10 x 12.5 cm, while sufficient for many small projects, is on the smaller side compared to some contemporary entry-level printers, which could limit the size of objects that can be printed in a single piece.
Conclusion: A Strong Entry Point into Personal 3D Printing
The MakerBot Replicator Mini, first announced at CES 2013, solidifies its position as a robust and user-friendly entry-level 3D printer. It particularly shines in its commitment to simplifying the 3D printing process, making it highly suitable for educational institutions, creative individuals, and anyone taking their first steps into the world of additive manufacturing. The meticulous design, from packaging to the intelligent features of the Smart Extruder and the comprehensive MakerBot Desktop software, demonstrates a clear focus on user experience.
While the machine has its limitations, such as its noise level and exclusive reliance on PLA filament, these are often offset by its consistent performance, ease of setup, and modern conveniences like Wi-Fi connectivity and remote monitoring. For users primarily interested in printing with PLA and who prioritize a hassle-free, guided experience, the Replicator Mini presents a compelling value proposition. It successfully lowers the barrier to entry for personal 3D printing, enabling rapid prototyping, educational projects, and creative expression with minimal fuss. In an era where accessibility drives innovation, the MakerBot Replicator Mini stands out as a reliable gateway into the exciting possibilities of desktop 3D fabrication.