

Artec Micro 3D Scanner: The Ultimate Review for High-Precision Small Part Digitization
Since its inception in 2007, Artec 3D has solidified its reputation as a leading manufacturer of professional 3D scanners, with its innovative equipment trusted by global giants like Tesla, Apple, Mercedes, and Nike. A testament to its commitment to quality and craftsmanship, Artec 3D proudly upholds its “Made in Europe” standard, with all its state-of-the-art scanners produced in Luxembourg. This strategic decision is both ambitious and unique in the industry, underscoring the brand’s dedication to meticulous engineering and unparalleled reliability. Initially gaining significant traction with its highly successful portable models, Eva and Spider, Artec 3D has continuously expanded its product portfolio to meet diverse market demands. Among its recent innovations is the Artec Micro, a specialized desktop 3D scanner meticulously engineered for the digitization and inspection of exceptionally small objects. Designed for applications ranging from intricate mechanical components and delicate jewelry parts to precise dental models, the Artec Micro offers unparalleled accuracy and ease of use, starting at a price point of €27,900 or $29,300.
The Artec Micro 3D scanner stands out in the market for its exceptional ease of handling and the revolutionary promise of “one-click” scanning. This fully automated, fixed 3D scanner simplifies the complex process of high-precision digitization, allowing users to scan parts up to 90 x 60 x 60 mm with an impressive accuracy of up to 10 microns and a minimum resolution of 29 microns. Beyond capturing geometry, the Micro is also capable of scanning object textures, providing vibrant color information with a resolution of approximately 6.4 megapixels. This capability makes it an ideal tool for applications where visual fidelity is as crucial as dimensional accuracy, such as forensic analysis, cultural heritage preservation, and intricate product design. Recognizing the potential of this advanced device for small part scanning, 3Dnatives recently conducted an exhaustive test of the Artec Micro to evaluate its performance in real-world scenarios. We aimed to answer critical questions: Does the scanner truly deliver on its promise of effortless operation and automated workflow? What specific types of parts are best suited for its capabilities, particularly in industrial and professional contexts? And, ultimately, does its selling price represent a worthwhile investment for businesses and researchers seeking top-tier precision and efficiency? Below, we share our comprehensive findings and feedback from our hands-on experience, providing a detailed insight into the Artec Micro’s capabilities and user experience.

The Artec Micro is delivered with a calibration tray, 3 types of clamps, adhesive paste, spacers, a USB 3.0 cable, a power cable, a protection mat, and spare air filters.
1. Unboxing and Initial Impressions of the Artec Micro Desktop 3D Scanner
Upon carefully uncrating the Artec Micro from its protective wooden case, its thoughtful design and robust construction immediately become apparent. The scanner boasts compact dimensions of 290 x 290 x 340 mm, making it a perfect fit for any desktop or laboratory workspace where space might be at a premium. Its minimalist aesthetic, featuring a sleek grey plastic top panel and elegant white metal side fairing, exudes professionalism and blends seamlessly into various high-tech environments. The rigid internal structure and a substantial weight of 12 kg instill a profound sense of reliability and stability, crucial for maintaining precision during delicate scanning operations, especially when capturing sub-micron details. The unboxing experience itself is comprehensive, as all necessary accessories for immediate operation are neatly organized and included, reflecting Artec 3D’s attention to user readiness. These essential components comprise a specialized calibration tray, a versatile set of three different types of clamps designed to securely fix objects of varying sizes and geometries, a user-friendly adhesive paste (similar to Blu Tack or Patafix) for irregular shapes, and a selection of spacers. These spacers are particularly useful for elevating very small parts, bringing them closer to the scanner’s cameras for optimal data acquisition and maximizing focal precision. Additionally, the package includes a high-speed USB 3.0 cable for efficient data transfer, a robust power supply cable, a protective mat to safeguard your workspace, and a set of spare air filters to ensure the scanner’s longevity and consistent performance by maintaining optimal internal conditions.
The fundamental principle behind the Artec Micro’s operation is its advanced optical system, leveraging structured light technology. The object intended for scanning is precisely mounted on a rotatable plate, which is itself positioned at the end of an “L”-shaped arm. This arm is capable of movement along two distinct axes, enabling the scanner to capture the object from every conceivable angle across a full 360-degree rotation, all performed autonomously. At its core, the scanner employs a sophisticated blue LED light source. This high-intensity, non-contact light projects precise blue lines onto the surface of the part. Two fixed cameras, strategically positioned to create a stereoscopic view, then meticulously observe and interpret any distortions or deformations in these projected lines as they interact with the object’s intricate three-dimensional topography. By accurately measuring these minute distortions from multiple perspectives, the Artec Micro rapidly constructs a highly detailed and precise digital replica, or dense point cloud, of the physical part, capturing its exact geometry and fine surface features with remarkable fidelity. This method ensures robust and repeatable results, even for the most challenging small objects with complex geometries, making it an invaluable tool for metrology, quality control, reverse engineering, and digital archiving in various demanding industries.
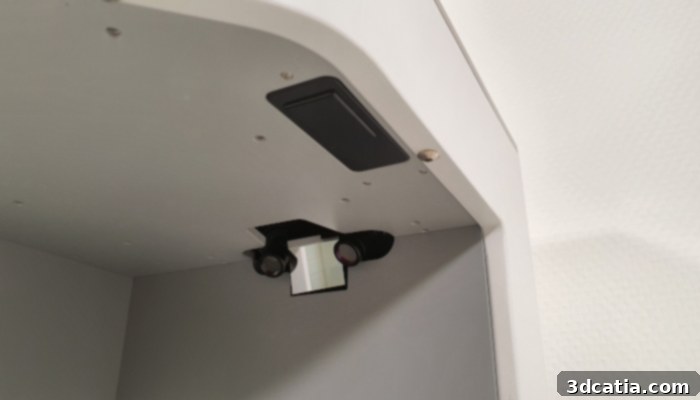
The Artec Micro is equipped with two cameras as well as a mirror to acquire the cloud of points
2. Setting Up the Artec Micro for Optimal High-Precision Scanning
Getting the Artec Micro ready for use is a remarkably streamlined process, designed for efficiency and minimal technical hassle. Much like installing a conventional peripheral such as a printer, the initial step involves installing the necessary scanner drivers. These drivers are conveniently integrated within the installation menu of the comprehensive Artec Studio software, ensuring a cohesive and simple setup. Once the software and drivers are successfully installed on your computer, the physical connection of the scanner is straightforward: first, securely connect the power cable to a suitable outlet, then connect the USB 3.0 cable to an available high-speed port on your computer, and finally, activate the equipment using the main power switch located at the back. This logical sequence ensures a quick and hassle-free setup, allowing users to transition swiftly from unpacking to operational readiness within minutes, a key advantage for busy professionals.
As a fixed desktop 3D scanner specializing in small objects, a critical aspect of the Artec Micro’s installation and subsequent performance revolves around the precise preparation and positioning of the object on its scanning tray. The choice and configuration of the included clamps and spacers are paramount, requiring careful adaptation based on the specific object intended for digitization. The primary objective is twofold: firstly, to position the object at an optimal distance and orientation from the scanner’s cameras to ensure the best possible data acquisition, capturing every intricate detail. Secondly, it is crucial to fix the object firmly and securely to the platform. This firm fixation is essential to prevent any minute shifts, vibrations, or unintended movements of the object during the scanning process, which could otherwise introduce inaccuracies or artifacts into the final 3D model, compromising the sub-micron level precision the Artec Micro is designed to achieve. The spacers are designed for ease of use, featuring a robust magnetic mounting system that allows them to be quickly attached to each other and adjusted in height, providing flexible support for various object sizes. The Artec Micro package thoughtfully includes three distinct types of clamps, each catering to different object characteristics and fixation needs. The vise-type clamp is ideal for securely holding the smallest and most delicate objects, ensuring they remain perfectly still. For irregularly shaped items, a versatile gum jig is provided, allowing users to adhere the object using the supplied adhesive paste (e.g., Blu Tack), offering excellent flexibility in positioning without causing damage. Lastly, a robust screw jig, equipped with four adjustable screws, is designed for larger objects that require more substantial and rigid fixation. However, a minor but important consideration with the screw jig is the potential for the screws to cast shadows on the object during scanning, which can affect data completeness. To mitigate this, users should exercise caution in object positioning, perhaps experimenting with different screw placements, or be prepared to perform a second scan in an alternative orientation, leveraging the powerful scan fusion capabilities of Artec Studio, which we will discuss further in the post-processing section.
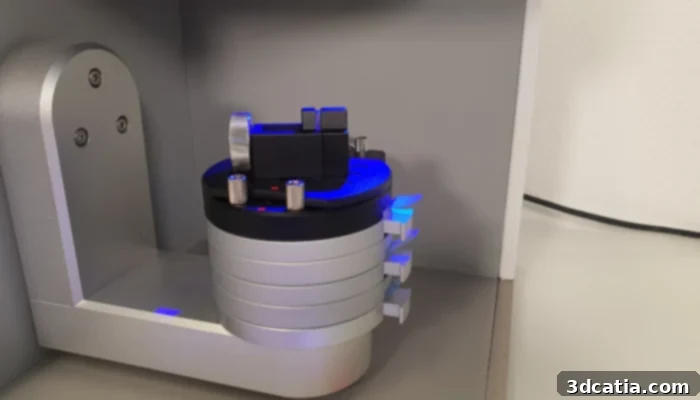
The Artec Micro is delivered with several spacers and 3 types of clamps to fixate the objects that will have to be installed depending on the part to be scanned
To finalize the installation and ensure peak operational accuracy, a crucial calibration step is required for the Artec Micro. This process is not a one-time event; it must be meticulously repeated whenever the scanner is transported to a new location or after any extended period of inactivity, ensuring consistent precision in all subsequent scans. The calibration procedure begins by precisely placing the magnetic calibration tray, which is thoughtfully provided with the scanner, onto two of the risers on the scanning platform. The actual calibration sequence is initiated directly from within the intuitive Artec Studio software. In a matter of seconds, and in a completely automated fashion, the Artec Micro systematically captures the tray from multiple precise positions and angles. This rapid data acquisition allows the scanner to self-adjust and fine-tune its internal optical parameters and mechanical movements, guaranteeing that it is perfectly calibrated and ready to deliver the highest level of accuracy and repeatability for all scanning tasks. This automated calibration underscores the system’s user-friendly design, minimizing manual intervention while maximizing reliability and metrological grade performance.
A final, yet often mandatory, preparation step involves addressing “difficult” parts – objects that present inherent challenges for optical 3D scanning. This typically includes materials with black, transparent, or highly shiny surfaces, which can either absorb light (making them appear as data “holes”), refract it unpredictably (causing geometric distortions), or cause excessive specular reflections that saturate sensors and distort scan data. For such challenging surfaces, Artec 3D highly recommends the application of an anti-reflection spray (this is an expendable item and not supplied with the scanner). This specialized spray creates a uniform, ultra-fine, matt finish on the object’s surface, effectively neutralizing reflective properties and ensuring optimal light diffusion. This uniform light diffusion is critical for accurate data capture by the blue LED and cameras, allowing the scanner to “see” the surface topography clearly. To assist users further in mastering these challenging materials, the manufacturer has developed a comprehensive guide offering detailed recommendations and best practices on this subject, providing invaluable insights into preparing various materials for successful scanning. This essential resource, which outlines specific techniques and considerations for different material types, is readily available for consultation HERE.
3. Mastering the Artec Studio Software: The Brain of Your 3D Scanning Operations
Artec 3D has developed its sophisticated proprietary software, Artec Studio, which serves as the central control hub for all its advanced 3D scanning products, including the high-precision Micro. As is common with professional-grade 3D scanning solutions, Artec Studio demands a powerful computing environment to effectively handle the vast amounts of point cloud data and complex algorithms involved in 3D model reconstruction and processing. Specifically, the manufacturer recommends a PC running Windows 10 x64, equipped with at least an Intel Core i5 or i7 processor, and a minimum of 32GB of RAM to ensure smooth operation, efficient data processing, and rapid generation of high-quality meshes. It’s important to note that, currently, Artec Studio is not compatible with Mac OS or Linux operating systems, a consideration for users with existing hardware setups. A significant user-centric improvement lies in the extensive language support, with over 15 languages available directly within the software’s interface, making it exceptionally accessible to a diverse global user base and facilitating seamless integration into international workflows.
During our extensive testing, we primarily utilized Artec Studio version 14. However, it’s worth noting that Artec 3D has since released Artec Studio 15, which introduces a host of new features and significant improvements in computing performance, further enhancing efficiency and accuracy. One particularly noteworthy enhancement in the newer version is the “Intelligent Scan” option. This advanced feature automatically defines and optimizes the scanner’s “scan path,” dynamically adjusting to the object’s geometry and complexity. This intelligent automation takes the guesswork out of complex object orientations and ensures comprehensive data capture with minimal user input, significantly streamlining the scanning workflow, especially for users who may be less experienced with 3D scanning intricacies or those dealing with highly complex geometries in high-throughput environments.
Visually, Artec Studio presents a clean, intuitive, and highly functional interface, designed for ease of navigation and user efficiency. The main menu bar is conveniently located on the left side of the screen, providing quick access to all primary functionalities and tools. Key modes, such as the “Scan” mode, allow users to initiate the actual scanning process with straightforward controls, leading them through brightness adjustments and path selections. Once a part has been scanned, Artec Studio provides a rich suite of powerful post-processing tools. Users can effortlessly rotate or realign the generated 3D model, perform precise measurements for quality control and metrology, and modify or delete specific elements of the part using advanced selection tools like the lasso, 2D, 3D, or automatic plan. Furthermore, the software offers powerful capabilities to fill any remaining holes in the mesh, refine textures for visual realism, and manipulate color data for precise material representation. A particularly valuable option for industrial quality control and reverse engineering applications is the ability to import an original CAD model and accurately align it with the digitized 3D model. This enables direct quality control comparisons, allowing users to precisely observe and quantify any deviations or differences between the intended design and the physical scanned object, which is crucial for manufacturing verification, inspection, and iterative design improvements.
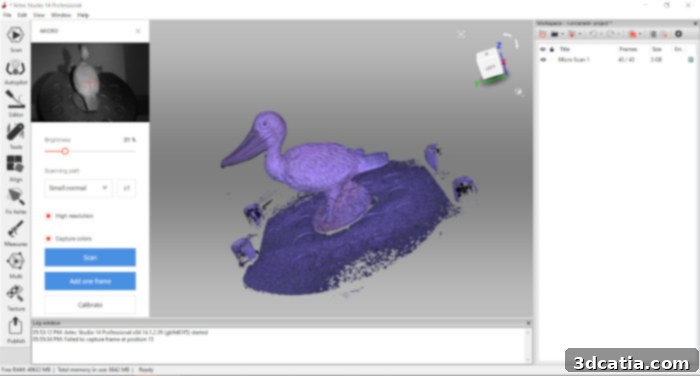
The Artec Studio software allows to control the 3D Micro scanner as well as the other products of the manufacturer such as the Leo, the Eva or the Spider.
Upon completion of the 3D model processing, the software offers extensive export capabilities, supporting a wide array of industry-standard formats. These include OBJ, PLY, WRL, STL (the ubiquitous format for 3D printing and many CAD systems), AOP, ASC, Disney PTX (PTEX), E57, and XYZRBG, ensuring broad compatibility with various CAD, CAM, CMM, and inspection software suites. For enhanced efficiency and a faster workflow, Artec 3D has thoughtfully integrated numerous keyboard shortcuts for most of the available tools, significantly speeding up the workflow for experienced users and power users. A unique aspect of the Artec Studio ecosystem is its licensing model, which operates on a subscription basis. Users have the option of an annual subscription for the latest version, Artec Studio 15, priced at €800 per year. Alternatively, a lifetime subscription is available for €2,000, which includes all future software updates, offering a long-term cost-effective solution for dedicated professionals and organizations. It is important for potential buyers to factor this software licensing cost into the overall investment, as it is an addition to the initial purchase price of the scanner itself, ensuring continuous access to updates, support, and the latest functionalities that enhance the Micro’s capabilities.
4. The Scanning Process: From Setup to Final High-Fidelity 3D Model
Initiating a scan with the Artec Micro is a remarkably user-friendly and guided process, beginning with a simple click on the dedicated “Scan” icon conveniently located in the left-hand menu of the Artec Studio software interface. This action opens a specialized panel that provides a real-time preview of the object within the scanning volume, alongside various essential parameters for configuration. The first critical setting to define is the “brightness level” of the scan. This parameter dictates how the scanner’s blue LED light interacts with the object’s surface, a crucial factor for optimal data capture. Generally, white and highly shiny parts require a lower brightness setting to prevent overexposure, lens flare, and excessive specular reflections, which can lead to data artifacts. Conversely, darker and matt parts necessitate a higher brightness level to ensure sufficient light capture and robust data density. The real-time preview is an invaluable visual tool here, as it allows users to actively minimize “red point clouds,” which symbolize areas with insufficient luminosity or data dropout, thereby optimizing the light settings for a complete, accurate, and high-fidelity scan across the entire object surface.
The second crucial parameter, a specificity of fixed desktop scanners like the Artec Micro, concerns the “scanning path.” The software intelligently prompts the user to select an optimal path – with 9 predefined paths available by default – that the scanner will meticulously follow to capture all angles of the object comprehensively and without omission. The choice of scanning path is primarily influenced by two key criteria: the physical size of the object and the complexity of its geometry (e.g., presence of undercuts, deep crevices, or intricate details). A larger or more intricate object will naturally require a more exhaustive path to ensure all features are covered. A highly beneficial feature is the option to add the capture of a single, specific angle if, during a preliminary scan review, certain data points are identified as missing (e.g., a small “hole” in the mesh, a shadowed area, or an uncaptured feature). This intelligent functionality avoids the necessity of restarting the entire scanning process from scratch, saving considerable time and effort in iterative refinement.
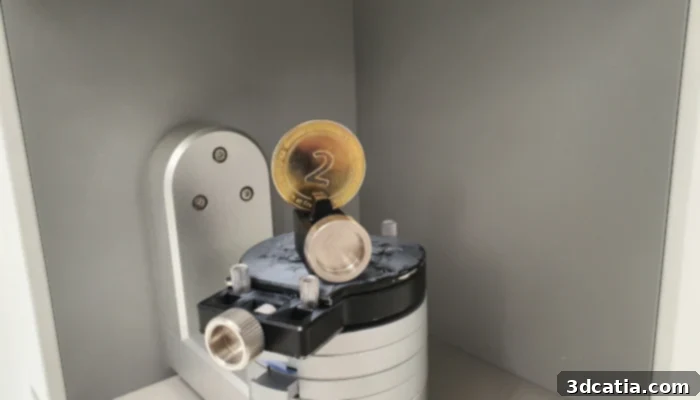
A coin placed on the vise type clamp. Note that we had to use a matte spray to reduce the shine of the coin before scanning.
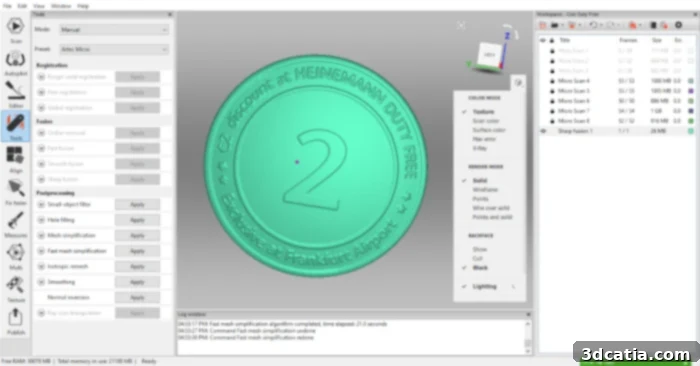
The result obtained from scanning the part. One will appreciate the clarity of the writings which measure only a few millimeters.
For quick assessments or preliminary checks of object placement and rough geometry, the “Preview” mode is exceptionally useful. This mode utilizes a simplified base scanning path, performing only six rapid captures of the object, which is sufficient to generate a preliminary 3D model preview in less than 30 seconds. This allows users to quickly verify object placement, approximate scan quality, and identify any immediate issues without committing to a full, high-resolution scan, thus optimizing workflow efficiency. For advanced users or highly specific applications requiring maximum control, Artec Studio 14.1 and later versions offer the flexibility to create custom scanning paths. This powerful feature is particularly advantageous for exceptionally complex objects with unique geometries or for repetitive scanning tasks in a production environment, enabling users to precisely define sequences of different angles and positions relative to the cameras. The goal here is to optimize coverage and data capture while minimizing the number of captures, thus preventing unnecessary computational load on the system and accelerating the overall process. Finally, the “high resolution mode” delivers, as its name suggests, a significantly finer level of detail in the resulting 3D model, capturing even the most minute surface textures and geometric nuances. This comes with the trade-off of extended scanning times, but for critical applications demanding the utmost precision, such as micro-metrology or detailed reverse engineering, it is an indispensable option. Crucially, to accurately acquire and render the object’s true color information, this option must be explicitly selected prior to initiating the scan, ensuring that the 6.4MP texture camera is fully utilized.
Once all parameters are precisely configured and the object is securely installed on the scanning platform, the actual scanning process can commence with confidence. The scanner’s robotic arm then meticulously positions the platform, dynamically following the pre-selected or custom “scanning path” with smooth, automated movements. Depending on the object’s complexity, its size, and the chosen resolution settings, the digitization process can take anywhere from a few seconds to several minutes. Upon completion, a first preview of the generated point cloud or mesh immediately appears on the screen, providing instant visual feedback on the quality and completeness of the scan data. This rapid preview allows for immediate assessment and, if necessary, adjustments, ensuring efficient use of time and resources before moving to post-processing.
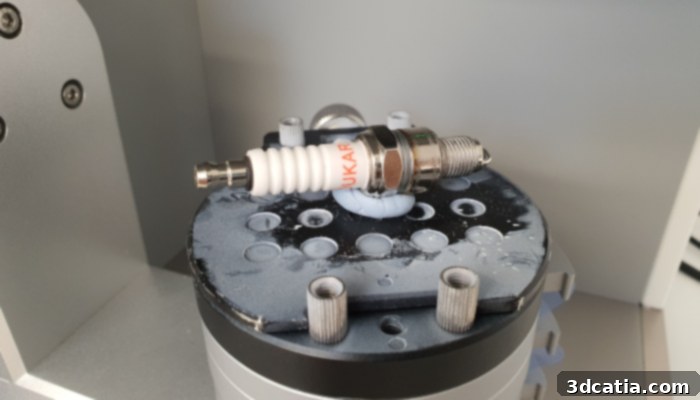
To scan this spark plug, we used adhesive paste on the gum jig (perforated plate). In the second step, we used matifying spray for the shiny parts.
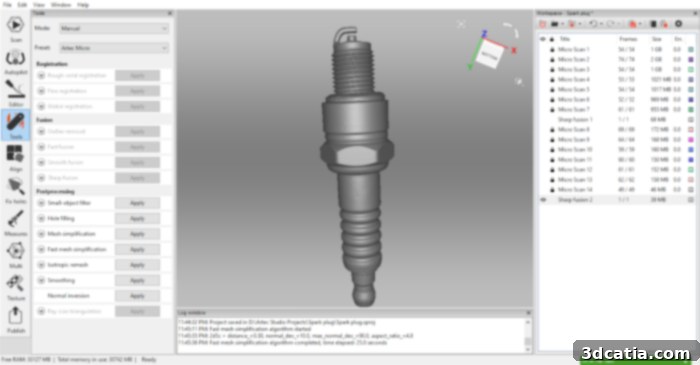
By digitizing twice, then using the Merge mode of scans, we obtain a high-quality replica of the spark plug.
Following the raw data acquisition, a crucial final step involves the comprehensive post-processing of the scan(s) to transform raw point clouds into a usable, watertight 3D mesh. Artec Studio offers a robust array of powerful and intuitive post-processing tools to refine and optimize the digitized model to meet specific application requirements. Key among these is the “Global Registration” step, which intelligently aligns and crops multiple scanned images, especially vital if the part inadvertently shifted slightly during scanning, ensuring a cohesive and accurate overall model. Users can also meticulously erase defects, remove unwanted point clouds (such as the adhesive paste used for temporary fixation or extraneous background noise), realign the entire object with respect to an ideal axis, and, critically, merge different versions of the same model captured from various orientations. The software further provides tools to efficiently fill any remaining holes in the mesh, reduce the overall polygon count of the object for easier handling in downstream software (while preserving critical detail), and apply or modify textural information, ensuring a visually accurate and data-rich digital twin. The flexibility and power of these tools are essential for producing high-quality, actionable 3D data suitable for metrology, quality control, or reverse engineering.
A common challenge in 3D scanning, especially with fixed desktop scanners, is that one face or a portion of the object is typically obscured by the mounting mechanism or simply out of view of the cameras during a single scan. To overcome this and achieve a complete 360-degree digital replica, it is highly recommended to perform multiple scans of the object (often two, three, or even four, depending on the object’s complexity and geometry) in different orientations. Subsequently, these individual raw scans must be seamlessly merged, a process expertly handled within the processing phase of Artec Studio. The software provides sophisticated merging options, including “Sharp,” “Fast,” and “Smooth” fusion types – although “Smooth” is generally not recommended for the Artec Micro due to its high precision, as it can inadvertently smooth out fine details. Users can also precisely define the desired level of resolution to be preserved during the merge and utilize powerful functionalities for automatically filling any remaining holes, ensuring a perfect, complete, and watertight mesh. This multi-scan and merge workflow is fundamental to unlocking the full potential of the Artec Micro for truly comprehensive object digitization, even for highly complex small parts.
In our rigorous testing, we selected three diverse models to thoroughly challenge the Artec Micro’s capabilities and evaluate its performance across different material properties and geometric complexities: a coin with exceptionally fine details measuring only a few millimeters, a complex car spark plug, and a vibrantly colored animal statuette. For both the coin and the spark plug, an essential preparatory step was the application of a matte spray to mitigate their inherent shininess and reduce potential light reflections that could interfere with accurate data capture. The overall experience of scanning with the Artec Micro, a fixed automated scanner, proved to be significantly simpler, faster, and more efficient compared to operating a manual handheld scanner. The automated rotation of the scanner around the fixed model eliminates the need for manual user movement, thereby saving substantial time, drastically reducing the possibility of errors caused by human shaking or inconsistent movement, and guaranteeing a truly comprehensive 360-degree scan with consistent data quality. This automation is a major advantage for repeatability, precision, and user comfort, allowing even novice users to achieve professional-grade results with minimal training.
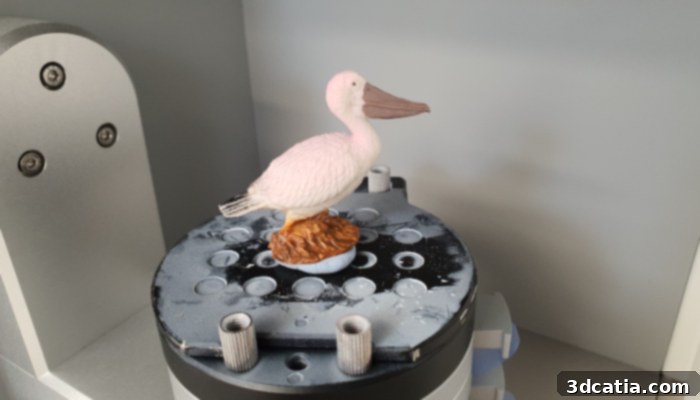
For our third piece, we went with an animal statuette – To fix it to the tray, we used adhesive paste
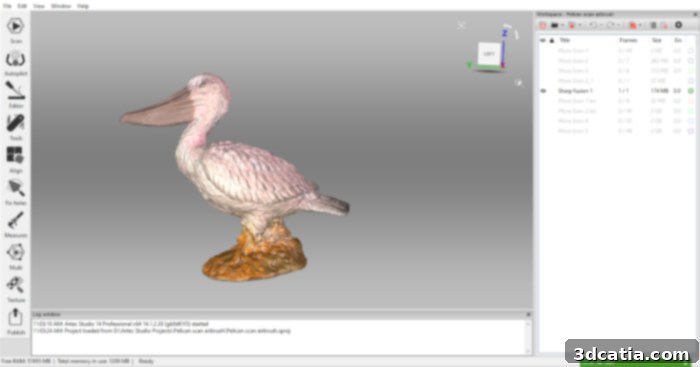
The result of the digitized statuette. Note the color texture faithfully restored.
The results were truly impressive and consistently met the high expectations set by Artec 3D. The coin, despite its minuscule features and delicate engravings, was captured with remarkable clarity and detail, faithfully reproducing textual and artistic elements that were only a few millimeters in size, making it suitable for forensic analysis or digital archiving. The spark plug, a more geometrically complex object with varied materials (metal, ceramic, and rubber), required two separate digitizations in different orientations, followed by the intelligent “Merge” mode in Artec Studio. This meticulous process yielded a high-quality, complete replica, capturing all the nuances of its intricate design and material transitions, ideal for reverse engineering or quality inspection. Finally, the colorful animal statuette, expertly affixed with adhesive paste, showcased the Artec Micro’s exceptional ability to capture not just geometry but also vibrant color textures. These textures were restored with striking fidelity in the digital model, making it perfect for creating realistic digital assets for animation, gaming, or product visualization. These tests unequivocally demonstrated the Artec Micro’s capability to deliver high-precision, detailed, and visually accurate 3D models of small and intricate objects, establishing it as an invaluable tool for a wide range of professional applications requiring ultimate accuracy, automation, and a streamlined workflow in demanding environments.
Find all our 3Dnatives Lab tests HERE